Archived Newsletter Re-Post.
The AOX Newsletter • January 2024 #5
A previous blog post titled, Abutment Placement: A Strategic Sequence, discussed the order in which I place my abutments for both optimal prosthetic flexibility and patient centered prosthetic design.
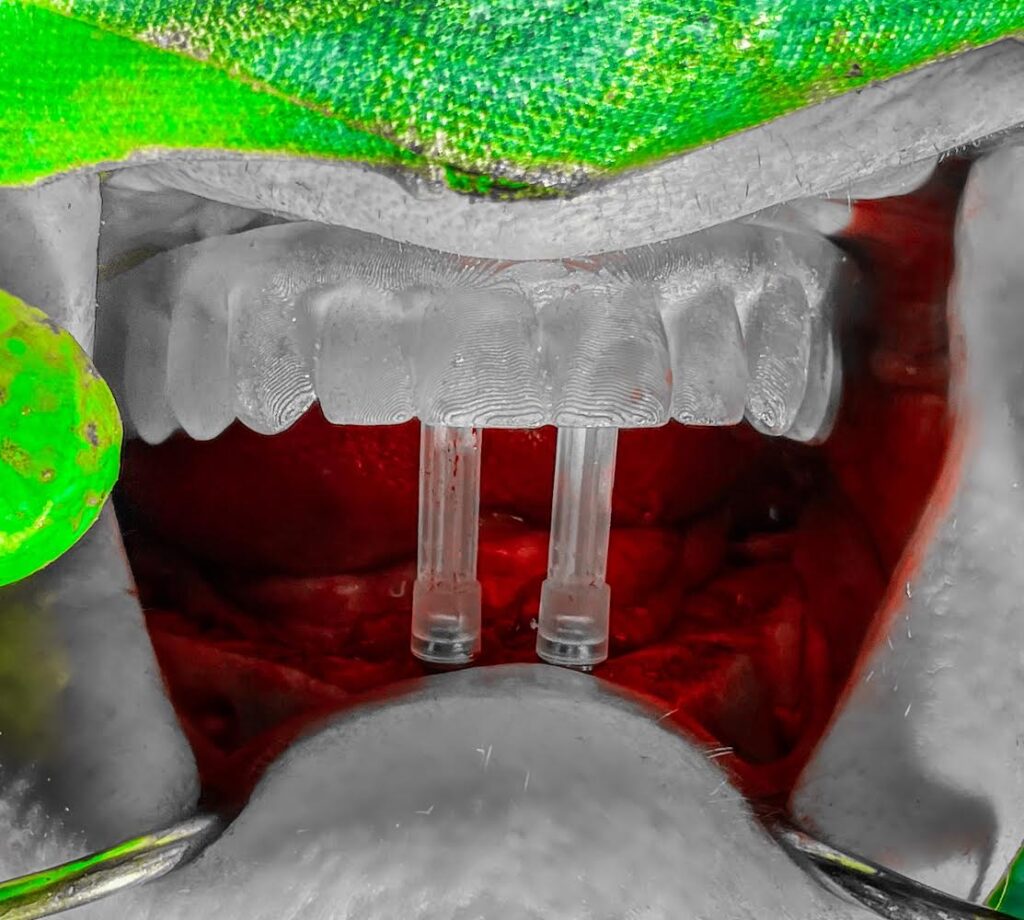
Following the article, I received a number of questions asking for a more in depth explanation of how I utilize the maxillary guide to fine tune my mandibular abutment position. As noted in the article, I actually do not use a mandibular troughed guide to assist with mandibular abutment selection.
Below I will explain in greater detail how I utilize this technique.
As it pertains to AOX surgery, we have two main areas of interest regarding how the mandibular dentition normally occludes with the maxillary dentition.
- We want to know where the mandibular lateral incisors normally contact the opposing maxillary dentition.
- We want to know where the mandibular posterior teeth (second pre-molar or first molar) normally contact the opposing maxillary dentition.
Why? Well, these are the usual anatomic locations for AOX implant placement in the mandible.
A typical dentate occlusal relationship would indicate that the mandibular lateral incisors come into contact with the area just above the cingulum of the opposing teeth. It is important to note that it is the incisal edge of the mandibular lateral incisor that is making this contact point with the maxillary dentition.
We cannot, however, surgically reproduce this exact relationship without some sort of small lingual flange. This is because in order to eliminate the flange entirely, the access hole of the anterior prosthetic mandibular tooth would most often have to come out of the incisal edge. This is clearly not esthetic.
Therefore, due to cosmetic concerns, this access hole needs to be lingual to the mandibular incisal edge. An ideal location is the cingulum of the mandibular prosthetic dentition. This location prevents a significant lingual flange or bulk to the prosthetic that patients frequently notice and dislike.
In order to create this screw access position, your mandibular anterior guide pin (which represents where your screw access will be) should come in contact with the cingulum of the opposing maxillary anterior dentition when the jaw is closed. This replicates, as close to feasibly possible, the incisal edge of the dentate lateral incisor coming to a stop just slightly above the opposing cingulum.
This is far more accurate than “moving around” the mandibular troughed guide to assess where the abutment “might” come out.
In the posterior mandible, a typical occlusal relationship would orient the mandibular central fossa of the posterior dentition essentially straddling the lingual cusps of the posterior maxillary teeth.
Our goal prosthetically is to have the posterior mandibular screw access hole exit at the central fossa of the prosthetic dentition. This minimizes buccal cantilever and is optimal esthetically.
Therefore, if the guide pin is identifying our “central fossa”, we want to line our guide pin up so that it comes into contact with the lingual cusp of the opposing maxillary posterior dentition. This will simulate a normal occlusal relationship and help provide the best prosthetic design.
This is all possible because the maxilla does not move and because the maxillary guide position is reproducible using the hard palate as an anatomical stop. This is why it is far more accurate and efficient to orient your mandibular abutments against the maxillary troughed guide, than the moveable, poorly reproducible mandibular guide.
I hope this helps you envision this technique with more clarity and that you enjoy using it as much as I do.
Matthew Krieger DMD
“Simplicity is the ultimate sophistication.”
Leonardo da Vinci
Q & A with Dr. K

“When I am planning cases I seem to only have space for a 3.5mm implant in the anterior mandible. Are you doing anything special in this area to be able to place a 4mm implant?”
I very rarely use a 3.5mm implant in the anterior mandible. There are always exceptions in significantly atrophic mandibles.
However, the mandible typically widens out as you move apically. After reduction, you almost always have more “width” than you originally did at the crest.
The vast majority of the time I place a 4mm wide implant in this region. If I am not placing a 4mm, I am more often than not, placing a 4.3mm or 5mm implant instead.
For reference, I am almost always reducing to the very bottom of the central incisor sockets. When my reduction is completed I can no longer see the mandibular central incisor sockets and can see only 1-2mm, if any, of the lateral incisor sockets.
Following this reduction, the alveolar crest is typically wider than it originally was, allowing for consistent placement of a 4mm implant.
Archived newsletters are released on a delayed timeline, a few months after the original publication. If you would like to receive these newsletters in real time please sign up here.


Pingback: Maxilla or Mandible First?? - AOX Surgery