
Closure says more about who a surgeon is than any other aspect of AOX surgery.
It separates those surgeons who are meticulous, from those who just want to be done.
Closure not only impacts healing and long term implant health, but it is also your final surgical signature.
Your closure is one of the only things your restorative doctor will ever see. They will directly correlate your surgical skill with your tissue management.
Efficiency is always important, but attention to detail during this step is vital.
Below, I will explain exactly how I close my All-On-X incision.
But first, let me point out what I am looking for in my closure.
- Primary closure (tissue completely touching/closed) at all points along the incision.
- Tissue tight and snug around abutments (not loose, floppy, or showing any underlying bone).
- Mandibular tissue firm and adhered to the mandibular bone via transosseous sutures for an easy prosthetic pickup.
- Tissue laying flat and at the same height throughout the incision (not lumpy).
So how do I achieve this?
Exactly How I Close My All-On-X Incision
My closure begins with my incision.
Removing the teeth first and performing the incision second allows for a smooth, flat tissue edge that follows the arch form. It also provides precision removal of the papilla.
Here’s a step-by-step guide to my incision: How I Perform My AOX Incision to Create Optimal Closure.
And here’s a refresher on Why I Take Teeth Out First and Make Incision Second.
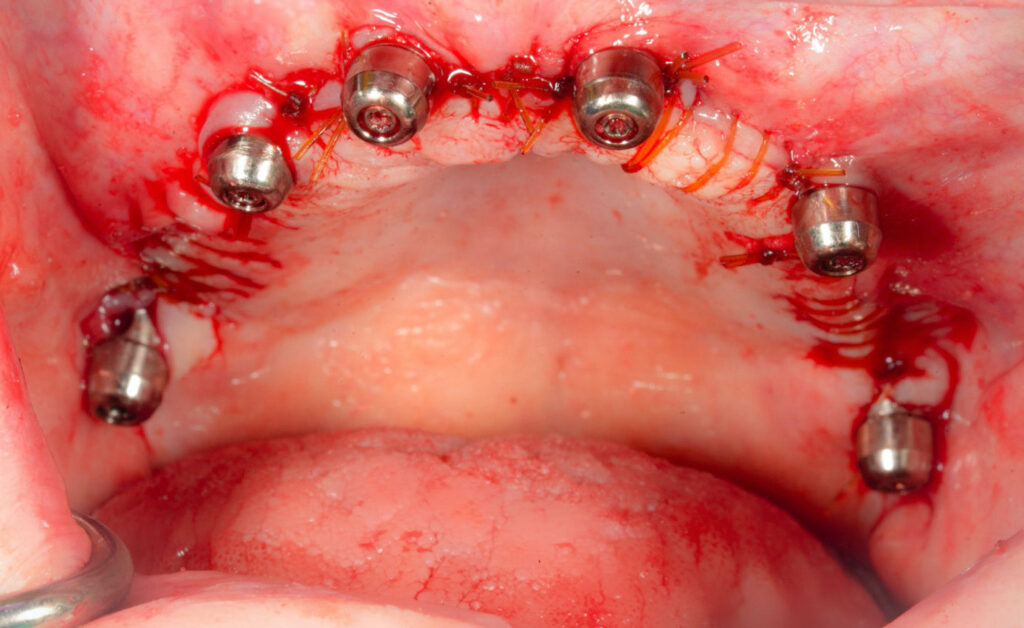
After implants and abutments are placed and I’m ready to close, I will do the following before requesting the needle driver and suture:
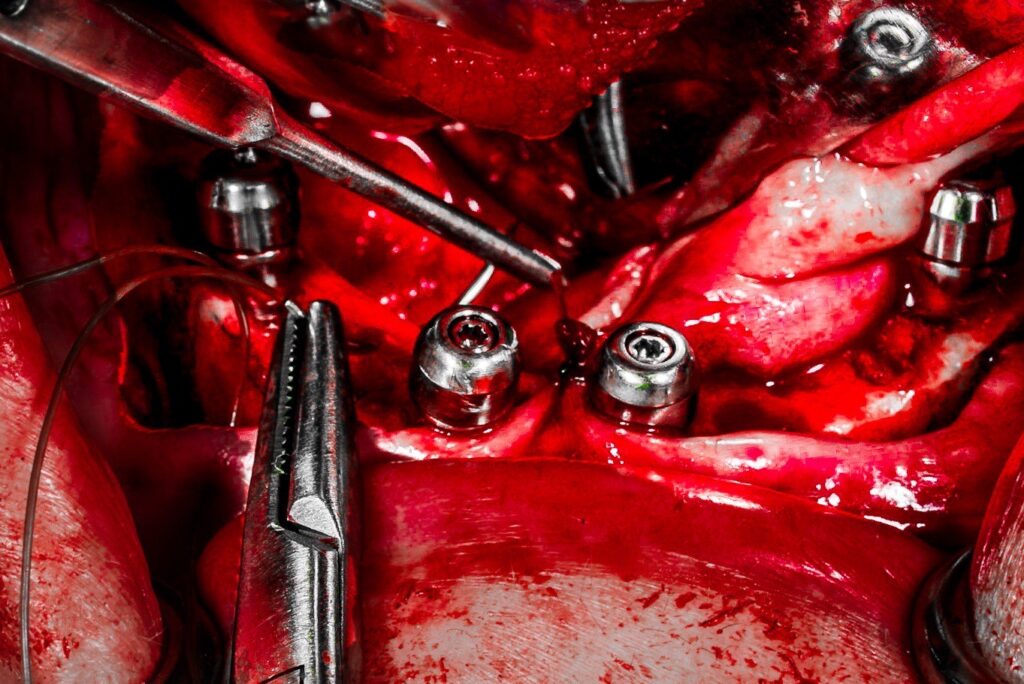
1. Utilize a tissue punch (typically a 5mm diameter) on the surgical handpiece to remove excess tissue around the abutments.
After reduction, there is almost always excess palatal tissue in the area of implants #7/10. A simple “half-punch” of the tissue on the palatal aspect of the abutment is usually all that is required to help the anterior tissue lay nicely.
When possible, I prefer to punch this tissue and actually pull it over the anterior abutments, encircling these implants in palatal keratinized tissue. Keep, in mind that this is not – and should not – always be possible. If the anterior implants are placed in a prosthetically driven position with a cingulum exit point – it is only possible to pull palatal tissue over the implants in cases with extensive bone reduction requirements.
Sites #4/13 typically require a “half-punch”, or 180 degrees of tissue removal on the palatal aspect as well. Occasionally facial tissue trimming is necessary but this is not common. The vast majority of the time I am only removing tissue on the palatal aspect. Remember that there is also limited keratinized facial tissue, so I attempt to preserve that tissue and remove instead from the palate.
Furthermore, keep in mind that at times no tissue removal is indicated at all. This is most often the case with edentulous patients.
The goal is to have as much keratinized tissue as possible around the implants and abutments, but with the tissue laying flat and the entire abutment exposed for prosthetic pick-up and future abutment access.
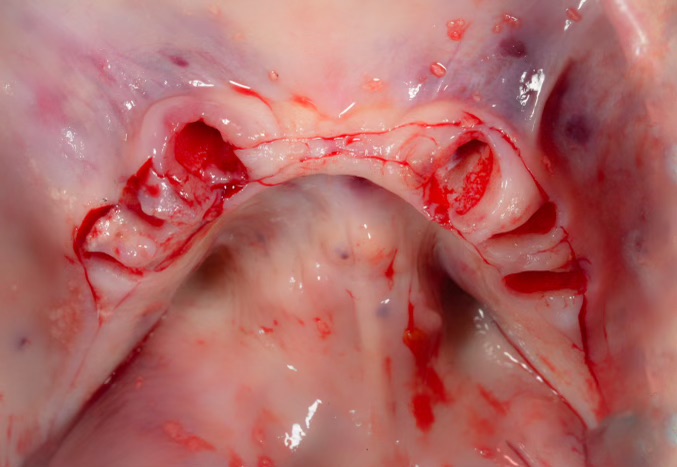
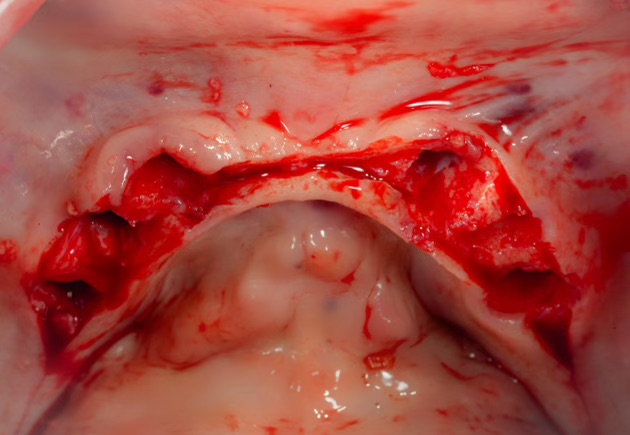
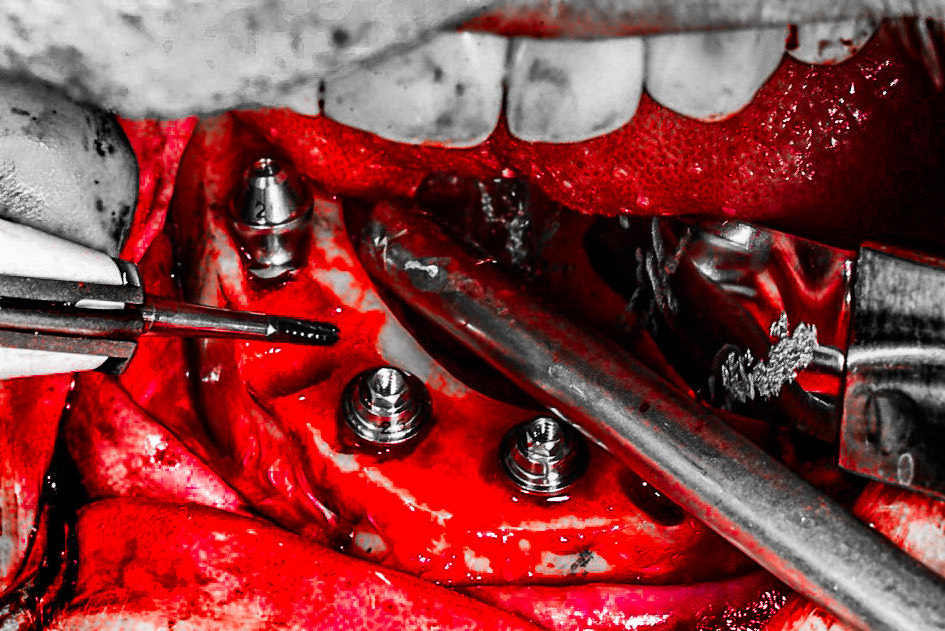
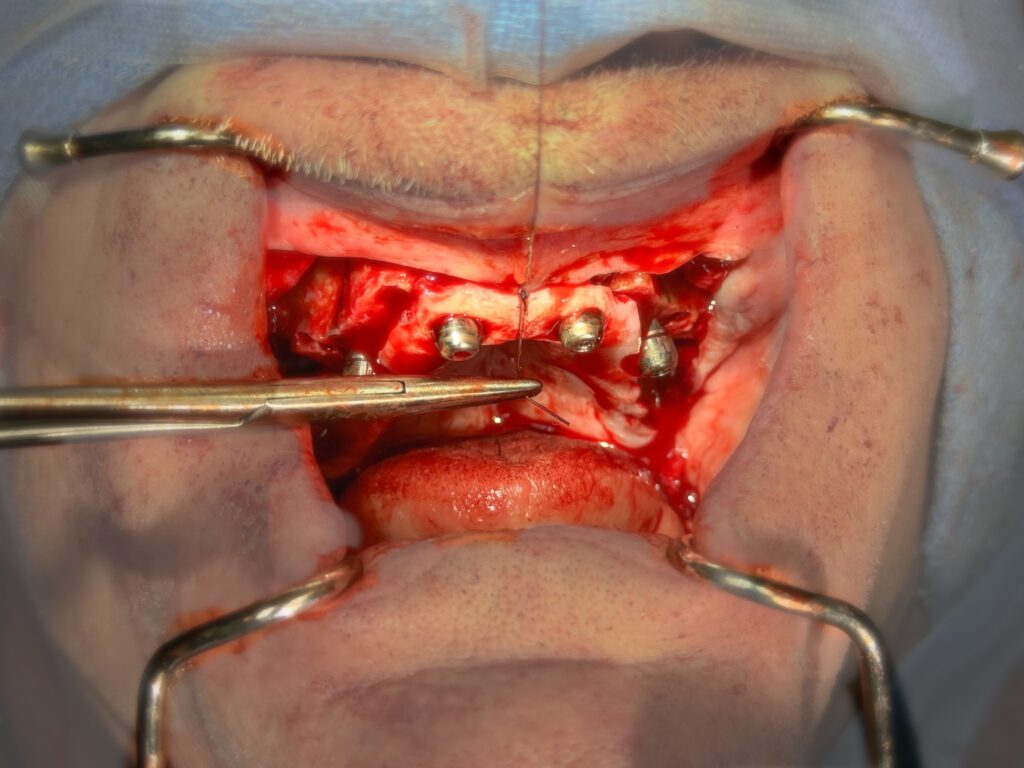
2. Place mandibular transosseous suture osteotomies between implants with a 702 drill and irrigation.
This provides an “anchorage point” for the mandibular sutures in order to prevent the notorious loose or “floppy” movement of the mandibular soft tissue after closure.
This will make the prosthetic pick-up much easier and more enjoyable for your restorative doctor.
Here is a step by step guide detailing how I perform the transosseous sutures: How To Secure Your Mandibular Tissue During Closure.
3. Remove a wedge of tissue at the maxillary tuberosity region with a pick-up and 15 blade.
I find this easiest to do at the end of the procedure when I can see how the reduction has affected tissue closure in this area. I also know at this point if I have or haven’t placed a pterygoid implant.
There is often excess tissue in this region and it creates a lump or ball back at the site of the tuberosity. *Keep in mind that I carry my reduction all the way through the tuberosity. If you do not do this – you may not have excess tissue in this region.
Removing a wedge allows the tissue to lay flat and create a smooth, even closure throughout your entire incision.
There is the possibility that even if there is a ball of tissue in this region, it may be so far back that it doesn’t affect your prosthetic. I still remove this wedge to allow the tissue to lay flat. This is simply for style points, but those are still important in my book.
At this point my assistant hands me a pickup, a needle driver, and a suture.
I close the mandibular tissue first. Why? Because it’s my least favorite part of the closure, so I try to get it out of the way…
1. I begin by first placing a single midline suture between implants #23/26 to ensure the mandibular floor of mouth tissues and facial tissues are properly aligned and centered.
2. I move on to the two mandibular transosseous sutures and place a single interrupted suture in each osteotomy.
This isn’t easy at first and will take some practice. But don’t get discouraged. It does get easier! (Please click here for a step-by-step outline of how this is accomplished)
3. After I have tacked my midline stitch and my bilateral transosseous suture sites to secure the mandibular tissue, it’s time to finish the mandibular closure.
My assistant places a tongue retractor on the left side of the mouth and I close posterior to midline.
I perform a running suture from the posterior extent of the incision to the distal of implant #20.
I then run another suture between implants #20-23. This will run over the top of the transosseous suture already in place.
I will typically add one additional interrupted suture at the midline between #23-26. There usually isn’t enough space to require running a suture in this region.
At this point the tongue rake is moved to the right side and the same protocol is followed, running sutures posterior to midline between each set of implants.
Why don’t I run one suture through the whole mouth to save time?
I prefer not to have one continuous suture. While this may save time, IF the suture comes unraveled or resorbs early – your entire incision can open up.
By running a suture between implants – if the wound dehisces, at most I may have the incision open up in one section of the mouth.
I now direct my attention to closure of the maxilla.
1. I begin in the anterior midline and place one interrupted suture to ensure the frenum is centered and in its original position.
Note that suture osteotomies are not necessary in the maxilla.
2. My assistant then places a tongue retractor to allow for easier access to the posterior aspect of the maxillary incision.
3. I then close from the most posterior extent of the incision to the midline, in a similar fashion as done in the mandible.
Continuous sutures are run between implants, exactly as was done on the lower arch.
I finish the maxillary arch by adding one interrupted suture on either side of my midline stitch to pull the tissue snug around the anterior abutments.
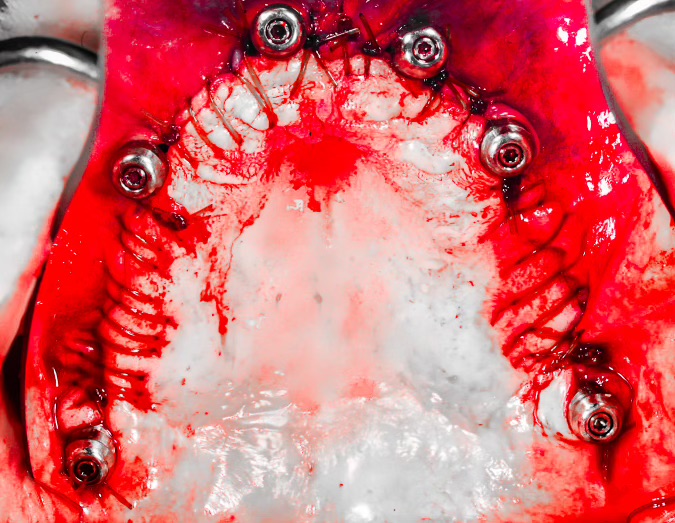
After closure of both arches, one last look is then carried out to confirm well approximated, primarily closed tissue that is snug around abutments and level throughout.
If I see an area that does not appear to be laying exactly how I prefer, I will go back and add an interrupted suture in this area to attempt to influence the tissue to lay how I want.
In a similar fashion, I may add an interrupted suture right at the margin of the abutment to pull down or firm up the tissue around the abutment collar.
Annnnddd at this point – it’s Case Closed! (Pun Intended)
Matthew Krieger DMD
Do you think it’s beneficial to add a few horizontal mattresses?
Thank you for another great post.
Hi Ken,
I don’t find this necessary in my hands. However, there is absolutely nothing wrong with doing that if that is your preference.
There is not “one right way” to close. I think great closure can be accomplished in different ways. The key is actually paying attention to it and taking the time to do it well.
Fun question that I want to adopt from orthognathics and may elicit an outrage either way: for all on 4, mandible first or maxilla first?
Hey Marcus,
I will be writing an article (likely a newsletter) regarding this topic. The short answer is, I don’t think there is a right or a wrong way. That being said, I do know surgeons in each camp – those that prefer maxilla and those that prefer mandible. I am going to review which I prefer and the reasons why in an upcoming article. Stay tuned! Great question thanks!
I assume this has to do with how I close but I am finding (on a decent percentage of my patients) that the lower left posterior implant keeps having no attached KG tissue on the buccal aspect.
I do surgery and restore so I am checking them at multiple points and find at the 3 week check or the 10 week check that I’m probably going to have to go back and do FGG on that buccal aspect.
Where it’s the same spot over and over, I assume I’m doing something goofy. (I’m right handed)
Hi Dr. Sharp,
Hmmm…That’s interesting. Honestly without watching you or seeing the post-ops it’s tough to know what’s going on. The obvious thought (which I’m sure you’ve addressed) is that you’re removing too much keratinized tissue with your incision. The keratinized tissue shouldn’t really “disappear” during the healing process so my initial thought is that you are inadvertently removing too much during incision. The easiest way to avoid this in my opinion is to remove the teeth first so that you have better access to make a more strategic incision. I would be extra cognizant in this area to leave as much keratinized tissue as possible.
My second thought is – are you trying to do any bone grafting around these implant sites at the time of implant placement? You may be unnecessarily grafting and creating a tissue reactivity or recession due to secondary inflammation at the graft site. I would advise to avoid grafting unless truly, truly indicated.
Third, while I would try to avoid bone grafting, I would suggest application of a flattened PRF clot over the buccal aspect of this implant to “plump” the soft tissue out in this region and enhance soft tissue healing in the area that seems to be prone to the defect.
Finally, the last thing I would say is to not feel the need to too quickly jump to doing other procedures like free gingival grafting or connective tissue grafting (*I’m assuming based on your question that you are indicating you have limited KG but NOT implant thread exposure). I would monitor the patient. Very often in AOX patients a lack of KG does not automatically mean the patient will become symptomatic or even have any issues with their implant at all. As long as their hygiene is adequate they may very well be just fine. Now, this is a different story if your implant has actual thread exposure or recession.
Hope that helps!
Matt
Dr. Krieger thanks for an awesome blog!
What are your thoughts on not getting primary closure to let KG tissue fill in? I’ve seen certain clinicians do this with excellent results.
Hi Grant –
Great question. I think this is a great article topic. But I will give a brief response here.
I always want primary closure (as opposed to intentionally leaving the incision open for secondary closure) for the following reasons:
1. Decreased post-op pain / sensitivity. It’s one thing to allow a single implant site to heal secondarily…but a whole arch is a different ballgame. If you’ve ever had a large dehiscence on an arch patient (essentially the same thing – you know that they are very uncomfortable.
2. I think the tissue architecture and how it lays (smooth and flat) allows for better hygiene and healing under the prosthetic – this is difficult to achieve with secondary healing since you aren’t really in control of the tissue.
3. I don’t feel keratinized tissue is as big of a deal in full-arch surgery as it is in single implant placement. Over the years I have only come across one patient to date who had issues with sensitivity / peri-implantitis that was presumed to be related to a lack of keratinized tissue. This has led me to the anecdotal conclusion that the closure itself is more important than the type of tissue. That being said I by no means disregard KG and I always attempt to preserve what I can. I just don’t feel it warrants leaving the incision open to heal by secondary intention in attempt to gain more KG.
Thanks – Matt
You are amazing, thank ou for sharing this wealth of information.