

The blog post Why I Converted to an Inverted V Configuration is one of the most frequently read articles on AOXSurgery.com.
It is also one of the posts I receive the most questions about.
In an effort to streamline my responses, today’s article will provide answers to some of those recurring questions.
Questions & Answers: The Inverted V Configuration
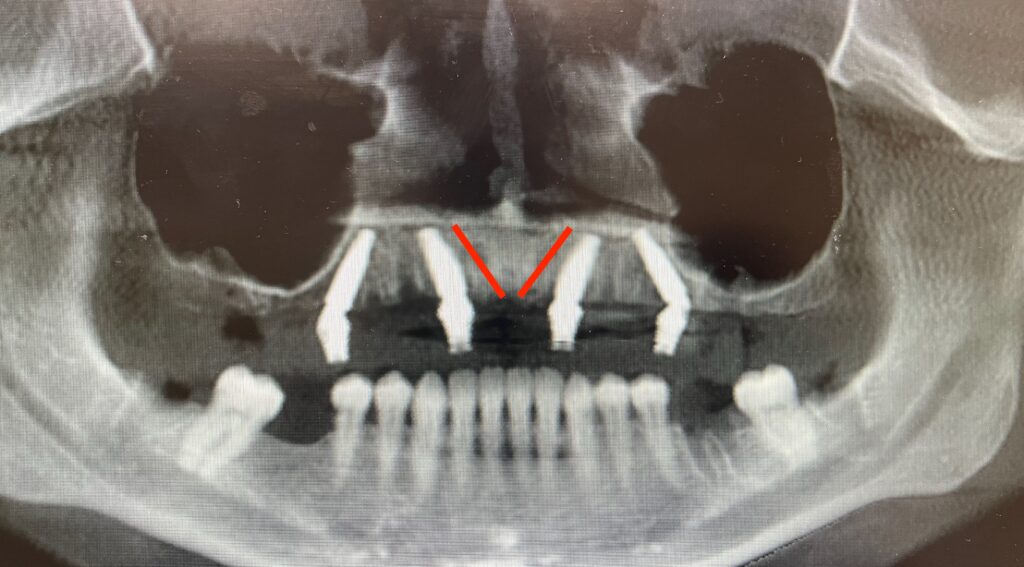
Question: I have never seen maxillary anterior implants angled this way. I’ve only known them to be placed vertically or angled laterally in an “M” configuration. How did you come up with the idea to angle them this way?
Answer: I did not come up with the idea of angling implants toward the midline.
I am not absolutely certain who first came up with the concept of angling maxillary implants toward the midline during AOX surgery.
However, the first published article to my knowledge on this concept is from Dr. Ole Jensen et al.in 2014.¹ It is my understanding that he and his colleagues were the first to document an AOX technique in which maxillary anterior implants were angled toward the midline, specifically to engage the vomer/nasal crest.
Question: Is the Inverted V Configuration the same as the Maxillary V-4 technique?
Answer: The Inverted V Configuration is a modified Maxillary V-4 technique.
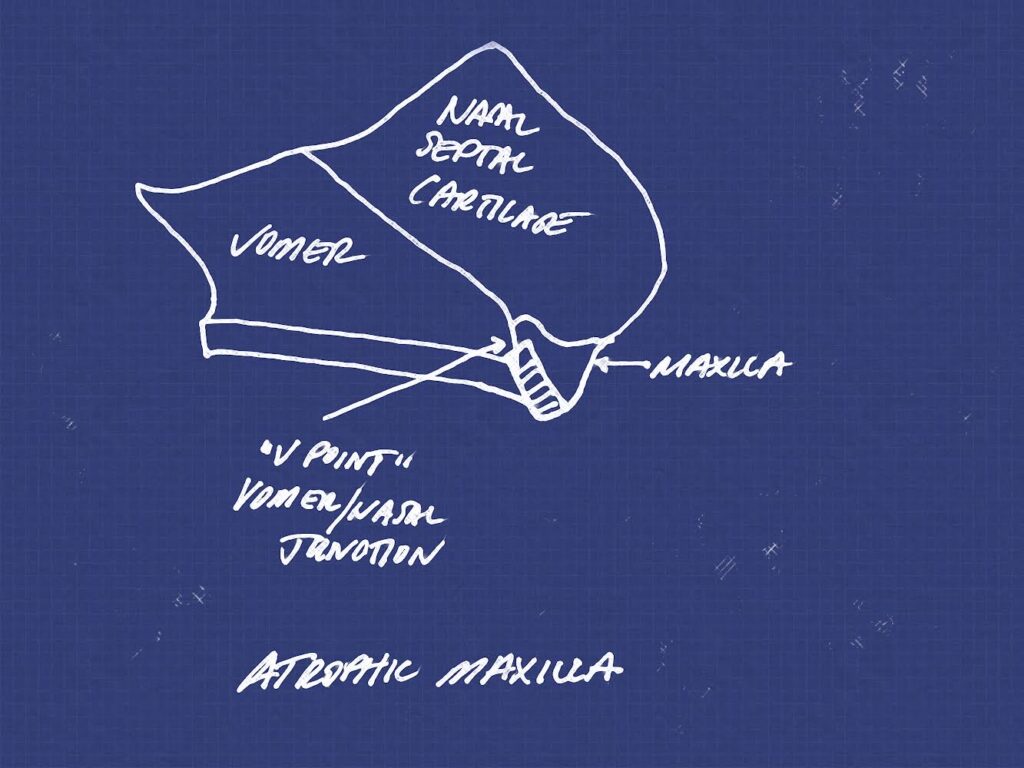
In 2015, Dr. Ole Jensen et al. wrote another article discussing angling implants toward the midline in atrophic cases, in order to engage the maximum available bone stock at the midline nasal crest/vomer location – termed “V-point”.²
In the article, this configuration was described as the Maxillary V-4 technique. This technique was designed to be used in significantly atrophic cases and would provide the ability to use the additional bone height and volume gained at the nasal crest/vomer location for anterior fixation – often preventing the need for quad zygomatic implants.
I learned this technique from the literature and wisdom published by Dr. Jensen.
However, I have also modified the technique I currently use, from its original design and intent.
The vast majority of the time, I do not perform a true Maxillary V-4 technique as described by Dr. Jensen et al.
Why?
I angle my implants toward the midline in virtually every single AOX surgery, not just severely atrophic cases.
I rarely engage V-point, or maximum bone stock at the nasal crest/vomer junction. Since I use this on every surgery I perform, most of these cases are not atrophic enough to require extension to this region. By definition, this is not the Maxillary V-4 technique.
I typically angle at 17 degrees toward the midline, but do not actually reach the midline. If you are placing your implants in the lateral incisor position in a Maxillary V-4 technique, you normally have to angle at 30 degrees to actual reach the midline and truly engage the nasal/vomer complex.
I am more concerned with a slight angulation (17 degrees) of the anterior implants than I am in truly engaging the nasal/vomer complex. This is because the angulation, regardless of engagement of V-point, provides real estate for the replacement of a posterior implant failure, as well as the prosthetic flexibility of an angled abutment verses a straight abutment. These attributes are what is most important to me.
There are cases where I will use a true Maxillary V-4 configuration, with 30 degree angulation of my anterior implants and extension into and engagement of the nasal/vomer complex in the setting of severe maxillary atrophy.
However, 95% of the time I am simply performing a slight 17 degree angulation of my anterior implants, without approaching anywhere near the nasal/vomer complex.
Question: Why do you call it the Inverted V Configuration?
Answer: The term V-4 actually appears to have first been reported in the literature by Dr. Ole Jensen et al in 2009.³ In this case, however, he was referencing this in regards to a mandibular configuration for severely atrophic mandibles. By angling the anterior implants in a V shape at approximately 30 degrees (as well as the posterior implants), he was able to treat highly atrophic mandibles of 5-7mm bone height, with traditional implant lengths.
It is my understanding that the term Maxillary V-4 was born as the sibling to the original mandibular V-4 configuration, and not necessarily in reference to V-point or the vomer bone (this is my conjecture following a review of the literature).
When I was learning this technique it was very confusing to me as to why it was called V-4. There is actually no “V” in the configuration at all. It is actually an upside down “V” or you could say more like an “A”. But again, it appears the “V” was in reference to the original mandibular “V-4” configuration – which is in fact a “V” shape.
When teaching new AOX surgeons, I have noticed that in trying to describe the concept of angling implants toward the midline, they are frequently confused when the term V-4 is used. When a V-4 configuration is described, many surgeons actually envision or treatment plan an “M-4” configuration. Why? Because when you look at the anterior implants in an M-4 configuration – they are actually in the shape of a “V”.
Furthermore, when I teach new surgeons what I do, I am not actually trying to get them to engage V-point (except on rare occasions), but rather to perform a simple and subtle 17 degree midline angulation of the anterior implants. Again, by definition this is not actually the Maxillary V-4 configuration. Therefore I did not feel it appropriate to call this technique by the name V-4, when I wasn’t actually trying to engage V-point, which is the basis for the V-4 configuration.
Following multiple instances of surgeon confusion with a “V” versus an “M” versus an “upside down V”, coupled with the fact that I was not actually performing a true V-4 configuration, I began referencing the desired maxillary anterior configuration as an “Inverted V Configuration”. I could have said “Upside Down V Configuration” – but it just didn’t sound as professional. I found that when the “Inverted V” nomenclature was used, new surgeons were more easily able to visualize and reproduce the desired configuration.
For this reason, I have continued to call the configuration I routinely use (which does not normally engage the nasal/vomer complex or V-point) the “Inverted V Configuration”.
For the sake of clarity, should your case dictate that you need to increase the angulation of your anterior implants to extend up to and engage the nasal/vomer complex (which I do ~5% of the time), the correct description of this technique would be the Maxillary V-4 Configuration.
Question: In your article you mention one potential benefit of this configuration is the ability to engage the vomer bone. I think you’re wrong. You cannot actually engage the vomer bone.
Answer: In my opinion, the statement above is both correct and incorrect.
Midline angulation allows us access to the nasal/vomer complex, which is one reason I prefer angling in this direction. To be crystal clear, while this is absolutely a benefit of angling toward the midline, the engagement of the nasal/vomer complex would more correctly be classified as a V-4 configuration.
However, as mentioned, I rarely engage the nasal/vomer complex. I am not normally performing a true Maxillary V-4 technique.
I utilize a modified version that simply angles implants toward the midline without the intent of truly engaging “V-point”.
Furthermore, unless you are treating a severely atrophic maxilla, you are very unlikely to be able to actually engage the nasal/vomer complex.
Why?
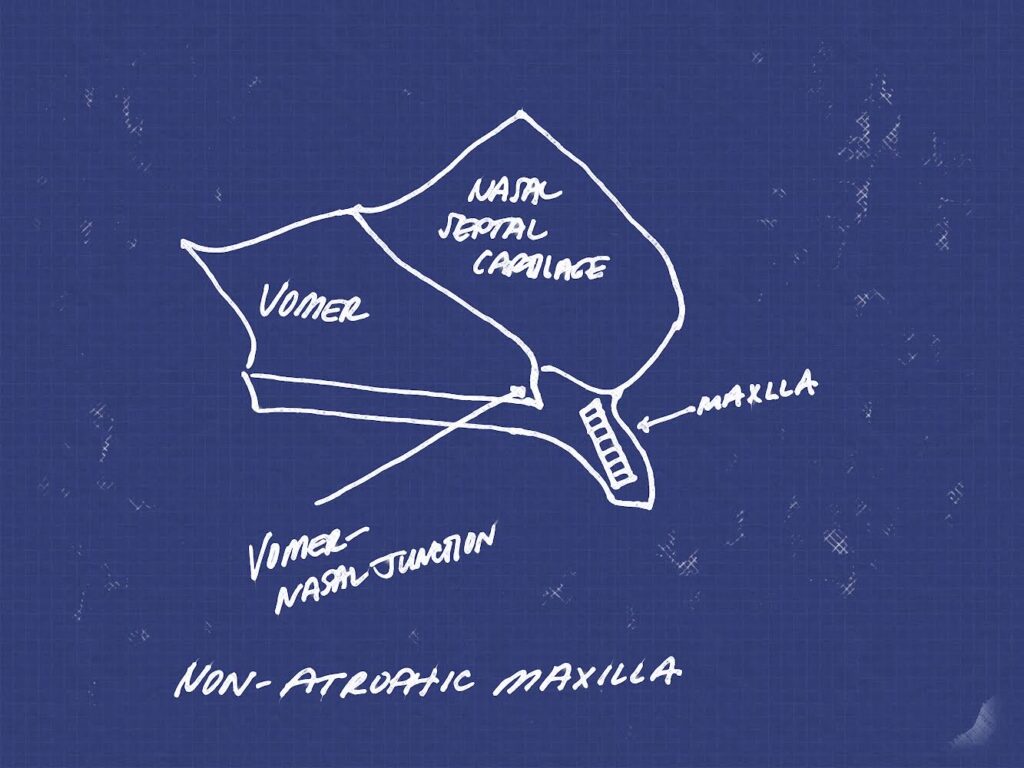
In order for the angulation of your implant to be able to predictably reach this anatomical site, you have to have notable maxillary resorption.
On a maxilla that is not significantly resorbed, it is difficult to actually engage the vomer bone complex, while maintaining adequate bony housing around the trajectory of the implant and/or while placing an implant that is positioned well prosthetically. Regardless, you can still angle your implants into the midline nasal crest, but it is not likely you are engaging the vomer suture.
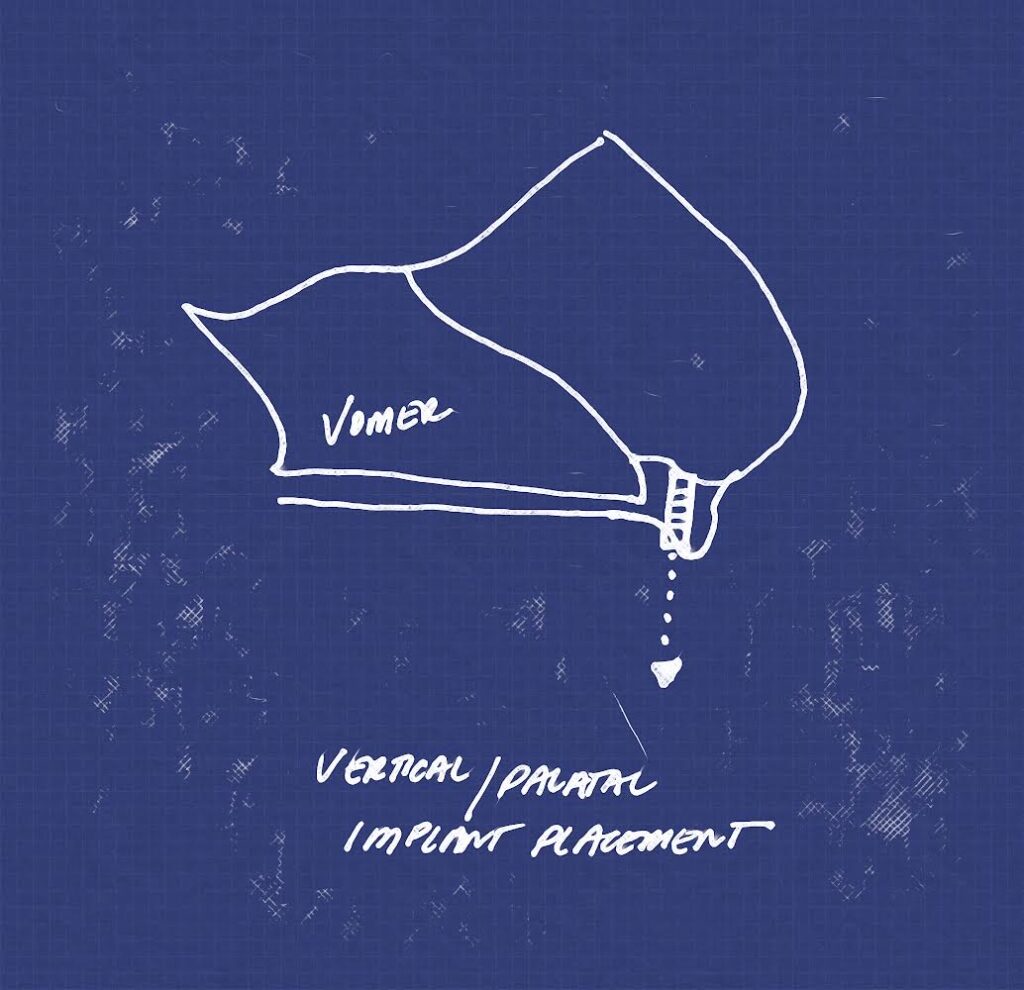
Many practitioners also routinely place their anterior implants in both a palatal and vertical position, regardless of bone availability. This is often done to engage denser palatal bone and avoid an extraction socket. However, when placing implants in this manner, it is almost impossible to engage the nasal/vomer complex. You are more likely to engage the anterior nasal spine. This is ok – but for the sake of this article, you’re angulation prevents access to V-point.
I attempt to place my implants in as prosthetically favorable a position as possible, regardless of whether or not this is inside an existing socket. This means my implants in the sagittal plane, follow a more natural path of the dentate root – and this is corrected by a 17 degree, or rarely a 30 degree abutment with the goal of a cingulum exit point. This angled, sagittal plane trajectory is often required to be able to actually reach the nasal/vomer complex.
Furthermore, I feel that there is a misnomer about what engaging the nasal/vomer complex, V-point, or a “vomer implant” really means.
The vomer bone is situated posterior to the anterior anatomical sites we normally utilize in AOX surgery. It is also very thin. It is not really possible, nor should you necessarily want to place an implant “inside” the vomer bone.
That being said, the vomer site referred to in the literature and often referenced with the term “vomer implant” is typically the suture or junction of the nasal/vomer complex, as opposed to the actual vomer bone.
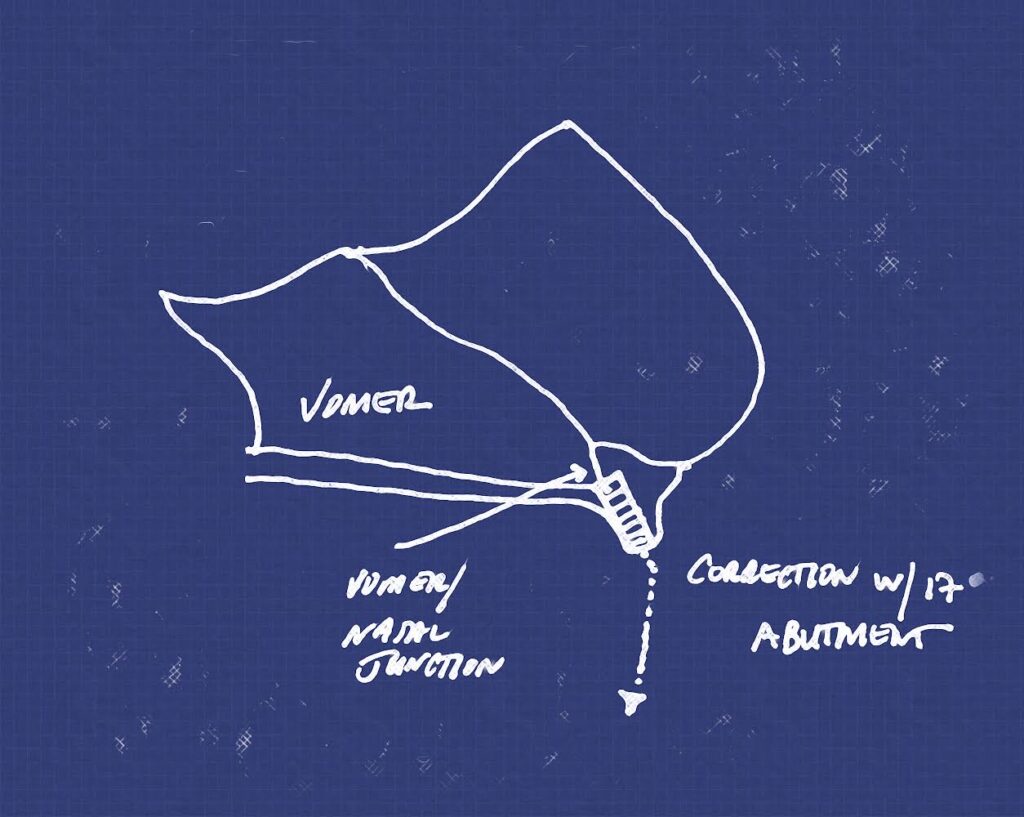
This junction occurs at the union of the vomer bone, nasal septal cartilage, and maxillary bone (floor of the nose). Picture the location where the tiny, anterior tip of the vomer bone meets the floor of the nose.
When I do actually access this site, I am not trying to place an implant “through” the vomer bone. This is next to impossible. I am trying to engage and utilize the increased bone height at the nasal/vomer junction to act as a “bony stop”. There may be 1-3 mm more bone height in this region that allows me to use an 8 or 10mm implant in an atrophic case without perforating through to the nasal cavity. This both protects the nasal cavity as well as provides a vertical bone stop for the implant. In my eyes, this is the true value of the “vomer implant”.
So, in this respect, yes I agree that the vast majority of the time these implants aren’t actually engaging the vomer bone.
However, in a true “vomer” implant as described by the maxillary V-4 technique, you are often utilizing the nasal/vomer junction (the union of the vomer bone and maxilla/floor of the nose). In this way you can actually use the tip of the vomer bone at this suture or junction as a bony stop, allowing for increased implant length.
Regardless of the fact that, in reality the vomer/nasal junction or suture (not necessarily the vomer bone itself) is really just used as a “bone stop”, it appears that the term “vomer implant” has stuck. Many very experienced AOX surgeons I know use this term (including Dr. Jensen in his articles).
If you still aren’t satisfied, I would suggest you read the mentioned articles by Dr. Jensen et al. as he repeatedly describes implant placement in the nasal/vomer junction. It is my opinion that he is the Godfather of AOX surgery here in the United States and has likely forgotten more about AOX surgery than we ourselves actually know about AOX surgery. His explanation is more than adequate for me.
Question: Do you still use this configuration in cases of severe atrophy?
Answer: Yes. As noted in the referenced articles, this is one of the main reasons a midline angled implant configuration was developed in the first place. In severe atrophy cases I will utilize a true Maxillary V-4 configuration.
Question: What’s the main reason you use the Inverted V Configuration?
Answer: For a full explanation check out the article, Why I Converted to an Inverted V Configuration.
Briefly, there are 2 principle reasons I utilize this configuration.
Both of these reasons do not require a true Maxillary V-4 configuration. Meaning, I am not angling at 30 degrees or engaging the vomer/nasal complex. These benefits are solely the result of a subtle angulation of the implants toward the midline.
- By angling the implants toward the midline at 17 degrees, I save valuable posterior bone real estate.
If a posterior implant fails, I am able to remove my posterior implant, redirect it from a 30 to a 45 degree angulation, and replace it with virtually the same exit point and A-P spread.
With vertical or M-4 configuration implants, this is often not possible as you will hit the apices of your anterior implants. Therefore with these configurations, a posterior implant failure will often require more complex techniques such as a pterygoid or zygomatic implant in order to rescue the case.
- With angled anterior implants, I feel I have greater prosthetic flexibility.
With 17 degree abutments, I am able to rotate them within an arc and move them more facial or more palatal as needed to achieve the ideal cingulum exit point, while still being parallel enough for restoration.
This allows both myself and my restorative doctor flexibility in the position of the screw access hole.
This also provides a greater likelihood of patient satisfaction by creating the ability to position the anterior abutment screw access points for a thinner palatal prosthetic.
With vertical implants and straight abutments, the only control you have over the screw access and your parallelism, is the one shot you get at the time of your implant placement.
There are many benefits of angling your implants toward the midline. Dr. Ole Jensen appears to have been the first to realize many of these benefits and coined the term Maxillary V-4 configuration to denote angled implants that engaged the nasal/vomer complex in severely atrophic cases.
With the advent of more AOX surgeries, and new abutments such as the 45 degree abutment, it has become apparent that a simple midline angulation as small as 17 degrees can provide a host of other benefits as well. This is true even in non-atrophic cases, as well as when the angulation of the implants does not actually approach or engage the nasal/vomer complex.
A modified version of the Maxillary V-4 technique, the Inverted V Configuration, can provide surgeons significant benefits without requiring 30 degree angulation or extension into the nasal/vomer complex. The modified technique uses 17 degree midline angulated anterior implants, in both atrophic and non-atrophic cases, that do not normally engage the nasal/vomer complex, yet still provide a plethora of other benefits.
It is my opinion that some variation of anterior implant angulation toward the midline is ideal for creating optimal long term prosthetic and surgical outcomes.
Matthew Krieger DMD
P.S.
A special thank you to Dr. Ole Jensen, and other surgeons like him, who have paved the way in this field and opened our eyes to ground breaking AOX concepts, such as the simple fact that anterior maxillary and mandibular implants do not have to be vertical.
References:
- Jensen OT, Cottam JR, Ringeman JL, Graves S, Beatty L, Adams MW. Angled dental implant placement into the vomer/nasal crest of atrophic maxillae for All-on-Four immediate function: a 2-year clinical study of 100 consecutive patients. Int J Oral Maxillofac Implants. 2014 Jan-Feb;29(1):e30-5. doi: 10.11607/jomi.te39. PMID: 24451885.
- Jensen OT, Adams MW, Butura C, Galindo DF. Maxillary V-4: Four implant treatment for maxillary atrophy with dental implants fixed apically at the vomer-nasal crest, lateral pyriform rim, and zygoma for immediate function. Report on 44 patients followed from 1 to 3 years. J Prosthet Dent. 2015 Dec;114(6):810-7. doi: 10.1016/j.prosdent.2014.11.018. Epub 2015 Sep 4. PMID: 26344193.
- Jensen OT, Adams MW. All-on-4 treatment of highly atrophic mandible with mandibular V-4: report of 2 cases. J Oral Maxillofac Surg. 2009 Jul;67(7):1503-9. doi: 10.1016/j.joms.2009.03.031. PMID: 19531425.