The infamous, anxiety-ridden, dreaded high smile line.
This is the patient that has kept many an All-On-X provider up at night, tossing and turning restlessly.
Some lay awake wondering if that transition line will actually be hidden after surgery?
Others may even be second guessing if the case should have ever been taken on in the first place??
With so much on the line, the surgeon may be questioning if the restorative provider has actually relayed accurate reduction numbers in their work-up? Can the required reduction really be that much?
And likewise, the restorative provider may be white knuckled with worry – wondering if the surgeon will actually reduce enough?
So many variables and so little room for error.
The stress is real. And, in all honesty, it’s probably warranted.
A patient that presents with a truly high smile line can often create a very difficult and even intimidating All-On-X surgical scenario.
This increased difficulty is due to the fact that a high smile line usually goes hand in hand with the following:
- Increased bone reduction requirements in order to hide the transition line.
- Limited remaining bone stock following reduction.
- Risk of exposure and/or perforation into the maxillary sinus and creation of an oral-antral communication.
- Decreased A-P spread as a result of increased bone reduction and subsequent loss of bone real estate relative to the maxillary sinus.
- Heightened surgeon pressure. These cases are demanding from both a clinical and mental aspect and the intra-operative pressure to load can weigh on the surgeon.
Ok – so we’ve established that these cases can be very demanding.
But… The good news is that most of the time high smile line cases are doable. And, they can be very emotionally rewarding for both you and your patient.
Below, I’m going to walk you through three specific surgical techniques I utilize to manage high smile line patients in the setting of All-On-X surgery.
Surgical Management of the Dreaded High Smile Line
Before diving into the three surgical techniques, I would like to address one key component of success related to this specific subset of patients.
Due to the complexity of these cases, they require a great deal of trust and experience between the surgeon and restorative doctor.
If you are an experienced provider that performs both aspects yourself, problem solved.
If you are a referral based surgeon, I would caution you against taking these cases on without having a great deal of trust in the skill and experience of your referring restorative provider. If you are a referring restorative provider, I would exercise the same level of caution in selecting and working with a surgeon.
These cases can be extremely rewarding – but they can also become train wreck nightmares if not done properly.
Ok, now that we have that settled, let’s dive deeper into the three surgical techniques I use to manage these challenging cases.
3 Surgical Techniques for Management of a High Smile Line
1. Staged Approach with Bilateral Sinus Lifts
This is one of the most predictable approaches and may very well provide some of the best results.
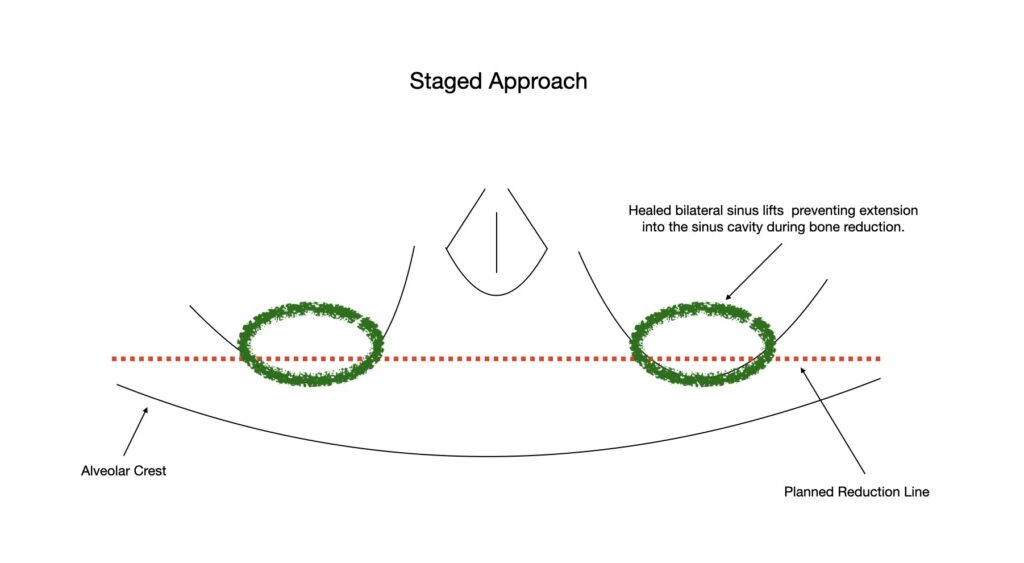
This is absolutely a great option when the planned reduction in a high smile patient significantly reduces A-P spread and/or extends into the area of the maxillary sinus. There may actually be cases where you need to reduce 3-5mm above the sinus floor.
In these scenarios, while it may not be “popular”, a simple bilateral sinus lift is your best friend.
After allowing the grafts to heal for 6 months, the patient is seen again for traditional AOX surgery.
These healed bilateral sinus grafts provide two significant benefits.
First, they allow you to perform a “routine” bone reduction with extension superiorly into the space previously occupied by the sinus cavity & membrane. However, now you can confidently reduce without concern for tearing the membrane and/or creating an oral-antral communication because you have well healed bone now occupying this anatomic location.
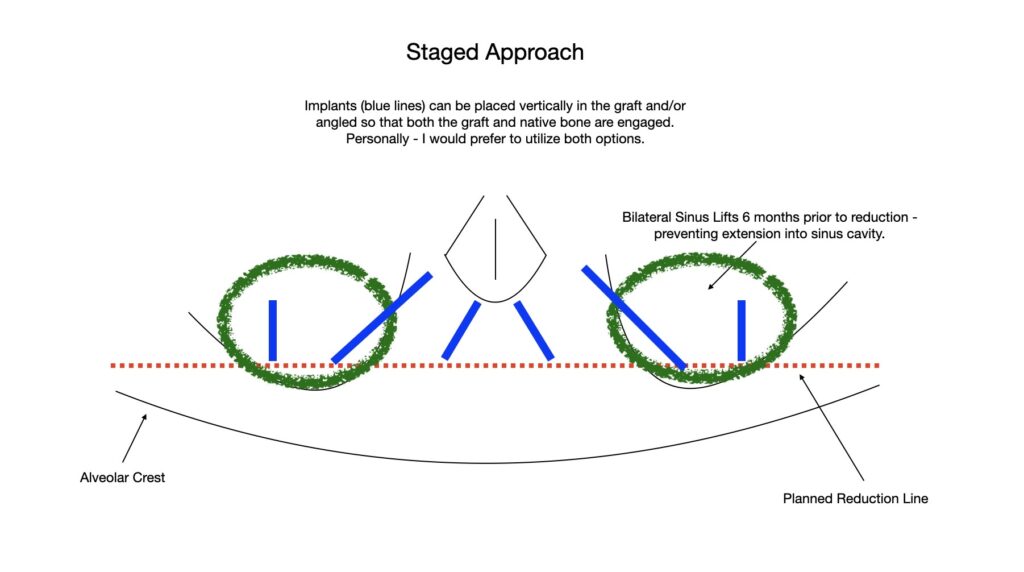
Second, for the all the naysayers that don’t want a posterior implant in a “grafted” site… have no fear. With the addition of the sinus graft, remember that you do not have to place a vertical implant in this area. Instead, the graft allows you to now angle as you would in a traditional AOX case.
In this scenario, your posterior implant can start in the graft at the second bicuspid or molar site so that you have significantly improved A-P spread. However, by angling you are able to position the apex of the implant in the patient’s own native bone, anterior to your grafted site, for improved torque.
While this technique is arguably the best in terms of predictability and final outcome, there is clearly an obvious downside:
The patient has to wait at least 6 months prior to having their AOX surgery.
For this reason, many patients elect not to pursue this option.
If this technique is selected, it is my preference to leave the patient’s normal dentition intact and initially perform only the bilateral sinus lift procedures. Six months following placement of the bilateral grafts, the patient would return and at that time extractions would be completed as part of traditional AOX surgery. When reasonable, waiting to remove teeth at the initial grafting appointment prevents the patient from having to wear a removable prosthetic during the interim period.
2. Non-Traditional Implant Placement
In the majority of high smile cases, significant extension into the sinus cavity during bone reduction is not necessary. However, what does occur as a result of the notable bone reduction is that A-P spread becomes significantly less with the traditional 4 implant AOX configuration.
For this reason, in management of these cases, the most frequent technique I utilize is a “non-traditional” implant configuration.
What does that mean?
In a routine All-On-X case, I am usually placing posterior implants in the second bicuspid region and anterior implants at the lateral incisor position.
Following bone reduction for high smile cases, it is often nearly impossible to reach the second bicuspid site, as it has literally been removed and this anatomic location is now the floor of the sinus.
Furthermore, following reduction, remaining bone stock in the anterior maxilla can also be minimal in height.
Therefore, high smile line patients force me to think creatively to achieve implant placement with adequate A-P spread. Here are a few “non-traditional” ways in which I overcome reduced bone availability in these cases:
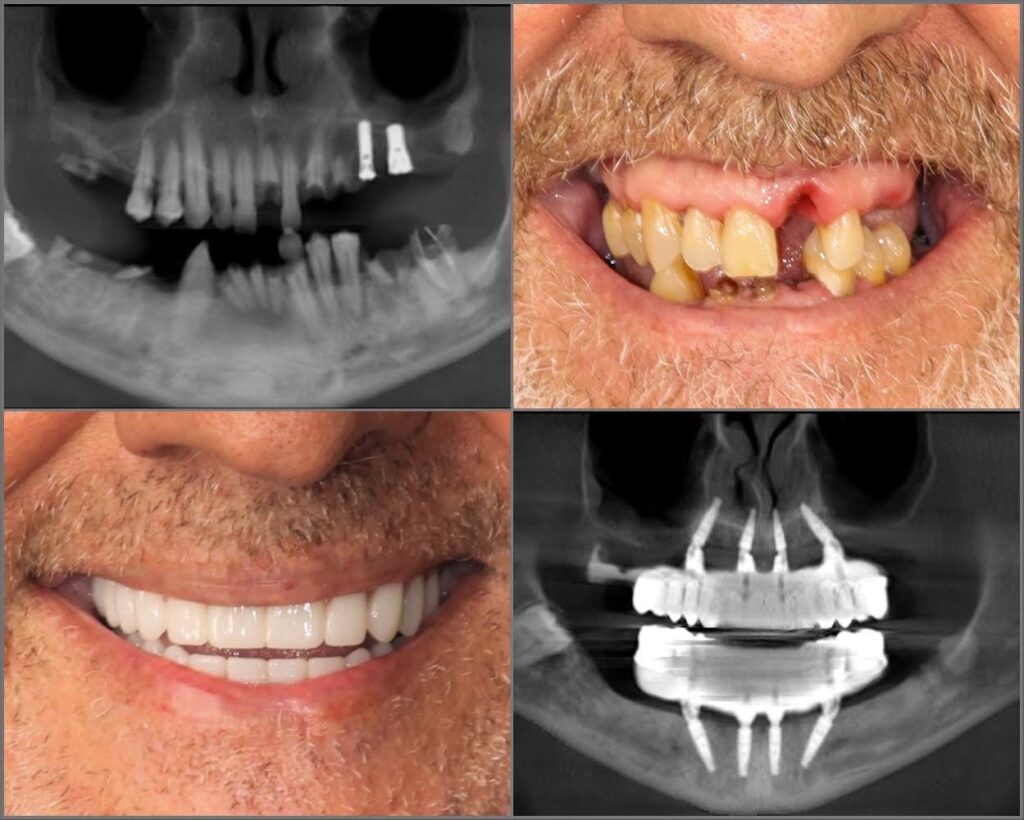
- Anterior implants are placed in an Inverted V configuration to engage increased bone height at the nasal crest. Even with significant reduction, I am normally able to place at least a 4×10 mm implant in this region.
- Posterior implants are moved forward to the first bicuspid, or even canine site, and a pterygoid implant is added for posterior support. In my opinion, pterygoid implants are an invaluable skill when performing high smile cases and planning to immediately load.
- Posterior implants are moved forward to the first bicuspid, or even canine site, and a palatal root implant is added for posterior support. Normally I prefer a palatal root implant over a pterygoid implant. However, with the reduction required for these cases, this option is usually not available. I always assess this site though when increased A-P spread is needed. Sometimes, a long palatal root socket will surprise you! Even after reduction to the sinus floor – the palatal socket will have 6-8mm extending palatally “under” the sinus. This is a wonderful site to use if it is available.
- A traditional A-P spread with 4 implants is achieved via a trans-sinus implant technique. This is not usually my first choice in high smile cases as increased reduction will leave little crestal bone overlying the sinus. This makes achieving torque difficult, requires grafting inside the sinus, and creates a higher likelihood of an oral-antral communication.
The vast majority of the time I manage high smile line cases with the above “non-traditional” implant placement techniques and configurations.
3. Floor of Antrum Repositioning Technique
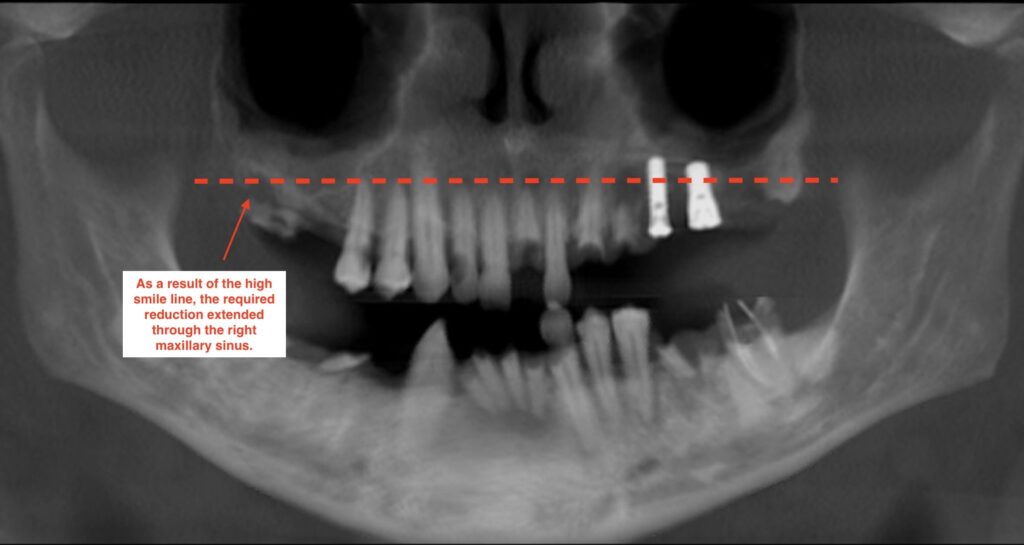
While rare, there will be cases where the smile line is truly so high, that you have to extend a significant amount of bone reduction into the sinus cavity in order to hide the transition line.
This can be as much as 3-5mm of reduction “above” the sinus floor.
Out of nearly 1700 arches to date, I have operated on a case with this type of bone reduction requirement on only 4 occasions. So it is not commonly seen. But… you will likely come across it at some point if you do enough arches.
In these extreme scenarios you really have two options:
- Follow the Staged-Approach outlined above.
- Utilize the Floor of Antrum Repositioning Technique.
As discussed above, the most predictable and arguably best approach to these cases is a staged approach.
However, many patients simply do not want to wait for sinus grafts to heal and therefore do not want the staged approach.
The catch is, in order to achieve adequate posterior restorative space and hide the transition line in these extremely high smile cases, bone reduction has to be carried into the level of the maxillary sinus – and actually through it.
Therefore, if we have not grafted the sinus, the floor of the sinus and the sinus membrane itself have to actually be lifted and repositioned. If this is not done, the membrane will be torn during reduction and a huge crestal oral-antral communication will be created.
The Floor of Antrum Repositioning Technique allows reduction to be carried posteriorly while maintaining the integrity of the sinus membrane. In these cases, I carry my reduction posteriorly with a barrel bur. Upon opening of the sinus floor from the alveolar crest, I utilize sinus curettes to elevate the sinus membrane from the antral floor. I then continue bony reduction as necessary until adequate restorative space is achieved, while elevating and protecting the sinus membrane. In this way the sinus membrane remains intact, but the bony floor of the sinus is effectively elevated to provide adequate restorative space.
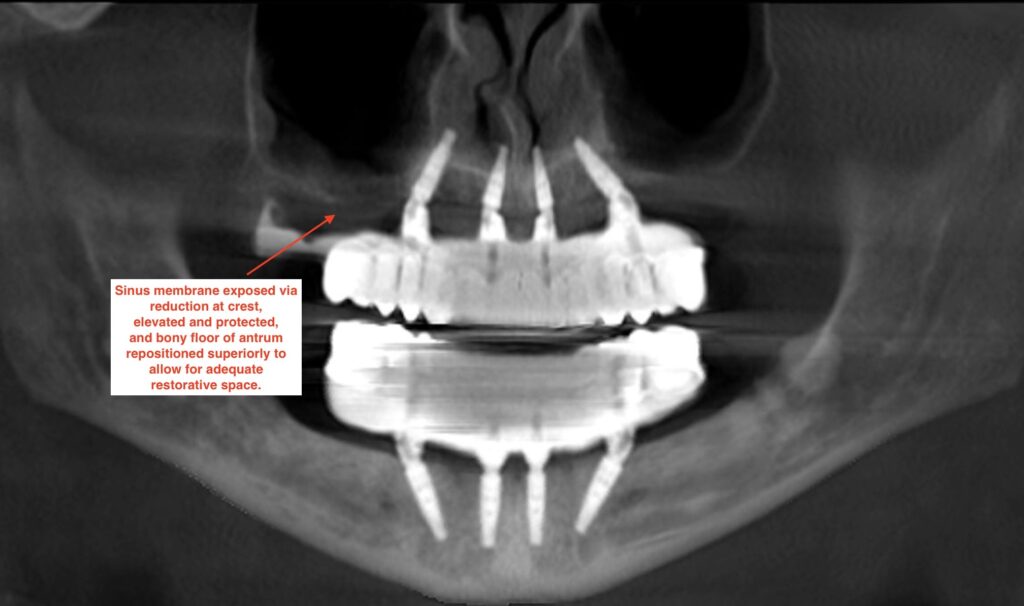
I am not going to discuss this technique in extensive detail. I simply want to point out that it is a technique I use to manage these rare cases.
This is a very advanced technique that does carry the risk of creating a large oral antral communication and it should be carried out with great surgical caution and by experienced providers.
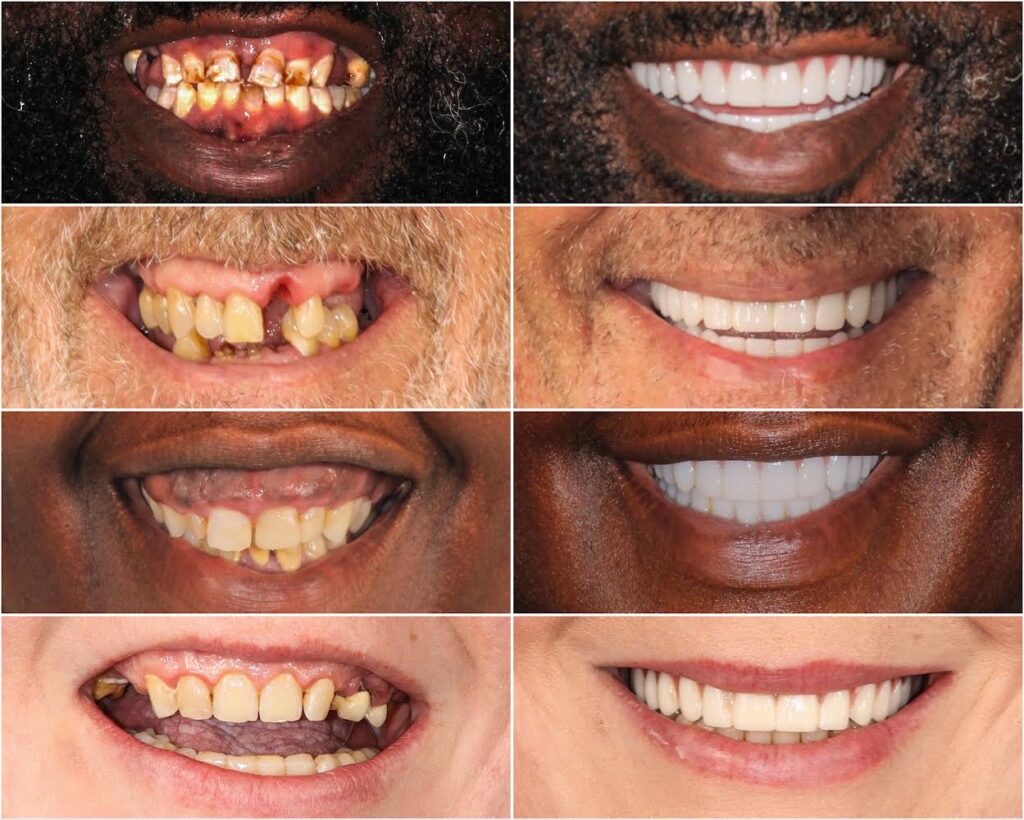
High smile line patients can present with some of the most difficult and stressful surgical and prosthetic All-On-X cases.
However, these surgeries can also be some of the most fun, rewarding, and life changing procedures.
Many high smile line cases can be managed effectively with detailed pre-op planning, a staged approach, and/or “non-traditional” implant placement.
I hope this article helps provide you inspiration and confidence – and maybe even an extra cheesy, big, high-smile grin…
Matthew Krieger DMD
P.S.
For those of you who haven’t been able to focus for the past two minutes because you have been spelling out the acronym for the Floor of Antrum Repositioning Technique in your head…Yes – it does spell out and is affectionately known as the “FART” technique.

great, important topic. Thanks a ton!
Thank you Ken! Glad you enjoyed the article!
love it , you are the best , so well explained .
any recommendation for good training on pterygoid implants
Hey Joseph,
As far as pterygoid implants, I am working on incorporating that topic into a future course. I am building both online and hands on courses, so keep your eyes on the lookout! Thanks!