
The acclaimed movie Rounders, tells the story of a professional poker player (Matt Damon) grinding it out to make a living, ultimately trying to make it big at the World Series of Poker in Las Vegas.
During his journey, he finds himself at an intense, high stakes table. Caught up in the moment, he foolishly bets his entire bankroll on one hand…and loses it all…down to the felt.
As he reflects on his loss, he cannot believe that he bet everything on one potential outcome. On one set of cards. No back up plan, no secondary way to win. The cards had to fall just right. How could he put himself in such a position!
As he walked away from the table he could not believe he had lost his discipline, let his emotions get the best of him, and subsequently broke The Cardinal Rule of Poker:
Always leave yourself outs.
He frustratingly reiterates to himself that the great players always leave themselves outs. They always have more than one way to win.
I have also learned over my career that this mantra could not be more true for All-On-X surgery.
In order to consistently, immediately load AOX surgeries, it is imperative to always leave yourself outs.
So what exactly does this mean in the context of All-On-X surgery?
When I treatment plan a case, my goal is to develop at least three possible treatment pathways.
These are three surgical “paths” that all get me from point A (the patient’s pre-op state) to point B (a prosthetically driven, immediately loaded, fixed full arch).
I always plan…that things won’t go according to plan. I want to ensure that I have always left myself outs.
And if on occasion things in fact don’t go according to plan…I know that I can seamlessly transition to “my next move”.
Here’s how I envision the 3 treatment pathways playing out in my mind:
Treatment Pathway A
The ideal scenario. Everything goes according to plan.
Treatment Pathway B
Not ideal…but manageable with a slight shift in the game plan.
Treatment Pathway C
Things are far more difficult than anticipated and we need to salvage this case so we can still immediately load.
Below I will outline an example of the three treatment pathways I mentally walk through for an AOX patient. Keep in mind that these scenarios change with each patient presentation and that the example provided below is specific to this patient and the provided pre-op imaging.
Learn to leave yourself outs…this is how you consistently load AOX cases.
Treatment Plan Scenarios

Treatment Pathway A
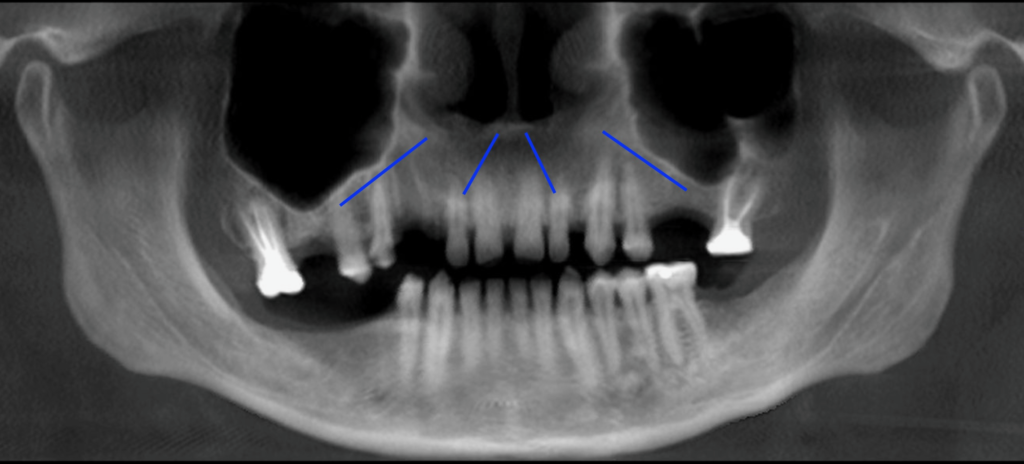
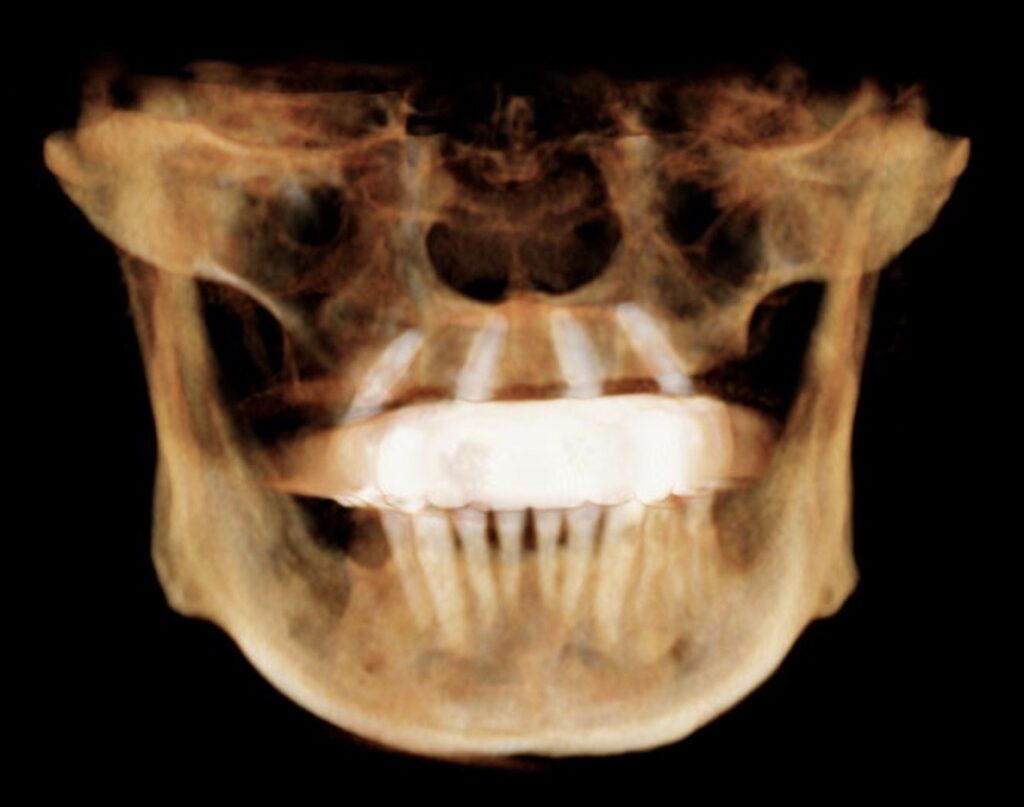
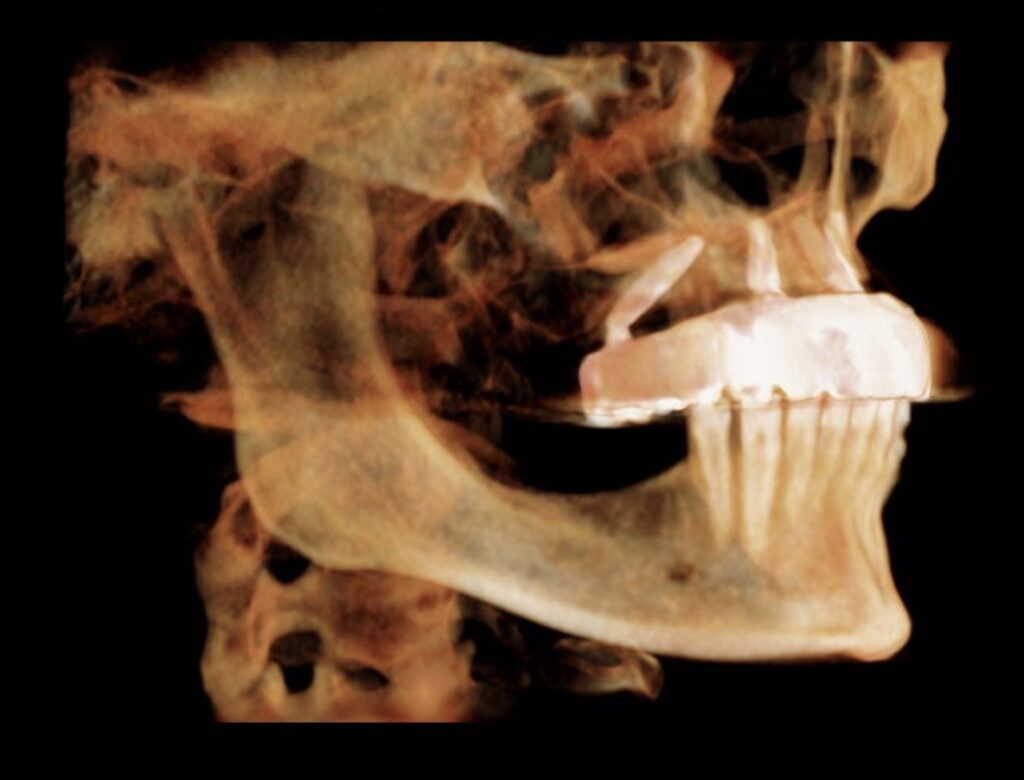
When I look at the pre-op pano I am first assessing the ideal treatment plan scenario. In my mind, this includes an A-P spread that extends to at least the 2nd bicuspid and is accomplished with a traditional 4 implant configuration.
This particular maxillary AOX patient presents with pneumatized sinuses, as well as an anterior extension of the sinus cavities. This type of anatomy can make achieving adequate A-P spread difficult.
With this presentation, however, I am confident that I can achieve a 2nd bicuspid spread with a 45 degree angulation of implants #4 and #13 and an “Inverted V” configuration of implants #7 and #10.
This would be Treatment Pathway A. This is the “simplest” surgical plan, utilizes a traditional 4 implant configuration, and achieves adequate A-P spread.
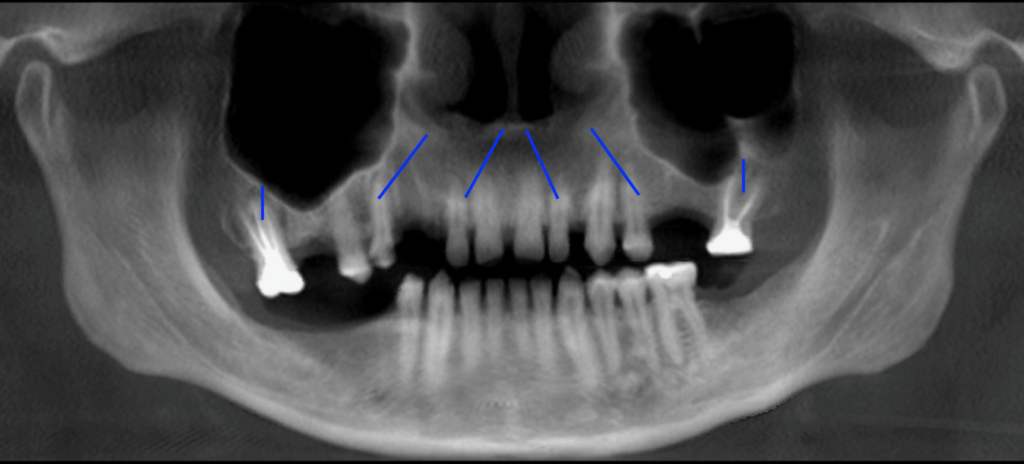
Treatment Pathway B
I know, that despite my confidence in Treatment Pathway A, this surgery can be very, very humbling. Therefore, I never stop at just “one” treatment plan.
When I look at this case I see 5 or 6 possible treatment scenarios. However, my goal as mentioned above, is to always have at least 3 possible treatment scenarios.
In this example, Treatment Pathway B would occur if I am unable to access the second bicuspid site following bone reduction. Increased reduction requirements will move the posterior implant anteriorly and decrease A-P spread. If I feel A-P spread would be inadequate, even with a 45 degree angulation, its time to move to Treatment Pathway B.
In this scenario, I would move my traditional posterior implants forward to the first bicuspid sites and place them at an angle of ~30 degrees. I would also add additional implants posteriorly, at the palatal socket sites of the existing maxillary molars. This would eliminate any cantilever created by the sinus anatomy and reduction requirements, as well as improve composite torque.
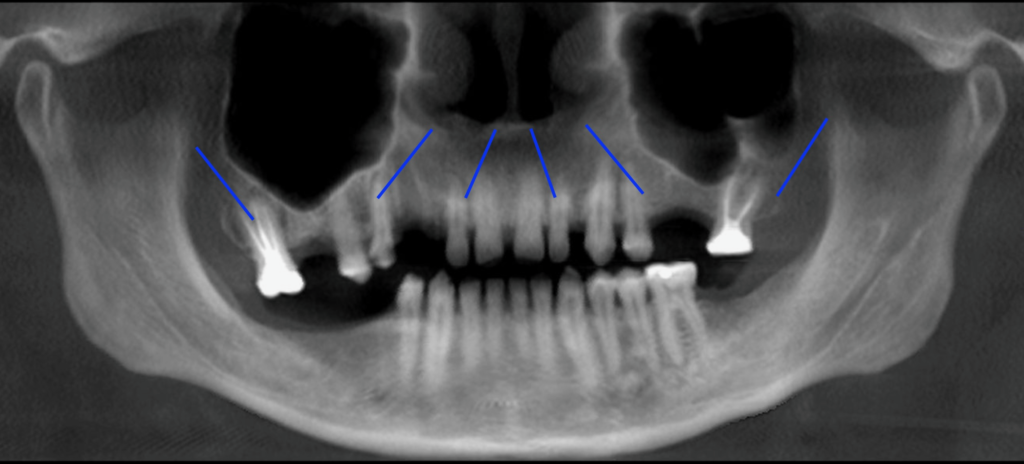
Treatment Pathway C
Continuing to mentally walk down the treatment pathways, I am now assuming for whatever reason, that I was unable to place a palatal root implant. Maybe there was a fracture of the tooth upon removal and bone in this area had to be removed to access the remaining root. Or maybe bone reduction requirements did not leave enough of a socket to utilize.
In either case, I would move on to Treatment Pathway C and place a traditional 4 implant configuration anteriorly, with a first bicuspid A-P spread. I would then proceed to utilize bilateral pterygoid implants to eliminate the otherwise two tooth cantilever, as well as improve composite torque.
And there you have it! This treatment pathway mental exercise takes all of 30-60 seconds, but allows me to know prior to walking into the surgical operatory what my options are if something does not go as planned. I always want to leave myself outs…
Why do I do this?
While a combination of burying implants and/or grafting and delayed loading is technically always an option, this is not what patients come to see me for and not the service for which they are truly paying. So, while this is always a possibility, I do everything in my power to avoid a delayed loading scenario, unless immediate loading is truly not beneficial to the patient.
Learning to leave myself outs with every AOX surgery has ensured that I am able to consistently load my AOX cases and has provided better surgical outcomes for my patients.
Remember that while you cannot predict every AOX surgical difficulty you may encounter, you can predict most of them.
Therefore, it isn’t wise to wait until you have a problem to try to figure out what you are going to do. You should have already ran through that scenario in your head.
Great AOX surgeons have already anticipated problem scenarios mentally and know what to do when things don’t go right. They know that if they cut enough arches, that unexpectedly difficult cases will come… and come again…and again – trust me.
I guess in the end…All-On-X surgery isn’t that different than high stakes poker.
Sometimes, deep in a surgery, your surgeon’s cap filled with sweat and your cortisol levels spiking, you feel like you have it all on the line.
In these situations, just remember The Cardinal Rule…of All-On-X surgery:
The great surgeons always leave themselves outs. They always have more than one way to win.
Matthew Krieger DMD
P.S.
This case was able to be completed with Treatment Pathway A as shown in the post-op images below.

Pingback: 8 Lessons AOX Surgeons Should Learn from The US Navy SEALs - AOX Surgery
Pingback: Arch Goals: A Master Guide to Your First 1000 Arches - AOX Surgery
Pingback: What is the Target Torque Value for My Implants? - AOX Surgery
love this – i have plans A, B, C for every case.
That’s awesome! As much as possible, I think that’s the only way to operate!
What are your outs for a soft mandible?
Hi Paul,
I will try to address this in an upcoming article. There’s too much thought process regarding that to write it all down here. But your request is officially on the “Blog List”!
Thanks –
Matt, great blog! Your free handed 45s are spot on in this post. What landmarks, tips/tricks, or techniques do YOU utilize to nail these freehanded? Ya know,… without perfing the sinus.
Hi Jared – Thanks for the feedback! Glad you are enjoying the blog!
There are many things I do to ensure optimal implant placement and angulation. It is not feasible to go into detail regarding all of them in this response. However, I will direct you to two articles that are critical in my opinion, to executing optimal implant trajectory and placement:
1. WHY I DRILL SLOWLY – BENEFITS OF THE LOW RPM OSTEOTOMY TECHNIQUE
https://aoxsurgery.com/why-i-drill-slowly-benefits-of-the-low-rpm-osteotomy-technique/
2. WHY I LOVE “GRAPHITE-GUIDED” ALL-ON-X SURGERY
https://aoxsurgery.com/why-i-love-graphite-guided-all-on-x-surgery/
These articles should get you started down the right path! I’m working on an online course which will go over in exquisite detail how I optimize my implant placement “without a traditional guide”.
Enjoy!
Pingback: The Perks of a Palatal Root - AOX Surgery
Pingback: 6 Scenarios in Which I Prefer to Bone Graft During AOX Surgery - AOX Surgery
Pingback: Why I Prefer a Palatal Root Implant Over a Pterygoid Implant - AOX Surgery
Matt, once again amazing blog. I had a question for you regarding this post and a few other blog posts that have similar ideas. If you are a new surgeon, or starting out with all on x and you are unable to perform pterygoids as possible outs, what is your recommendation? I know case selection is key. Only thing I can think of is having a mentor on site that, in hopefully very few cases, come in and place pterygoid for you. Only other option I can think of is graft and not load case. Thanks again for the amazing content.
Hi Grant,
So a couple of things in response to this question:
1. There are many options beyond pterygoids to help if you get in a difficult situation. But many of these are also somewhat advanced techniques. These require a much more detailed explanation and teaching session than is allowed in this response.
2. You are correct – when you are starting out case selection is vital. This will keep you out of 95% of problems until you are able to build your skills and confidence. (*I will be announcing my upcoming full arch course in August and it is scheduled to launch in October. One of the big areas we will cover in the foundational course is case selection and management.)
3. Yes – grafting is always an option. When I began I told every patient that there was the possibility of delayed loading and/or grafting. I rarely had to do it, but I knew that if something really got difficult I could fall back on sinus lifts/grafts etc. and that the patient was already aware. When you are starting out I truly feel this is the best option for those 5% or less of cases that are unexpectedly difficult (assuming you have done proper case selection). I actually don’t think inexperienced providers should be doing things like pterygoid implants and/or zygomatic implants.
You can also read my article here titled: Arch Goals that outlines my “ideal” path for a new surgeon to build experience.
Thanks,
Matt