

Ahhh… the amazing maxillary molar palatal root socket.
So frequently overlooked.
And yet it keeps showing up, waiting patiently to be noticed.
Hoping to help make our lives easier.
A built in cantilever destroyer.
I love it when I see a maxillary molar still present in a pre-surgical All-On-X dentition.
That palatal root socket is a wonderful built in safety net! And, I have used this safety net many, many times over the years.
It’s also an incredibly simple, minimally invasive way to achieve an ideal spread and completely eliminate a cantilever for our patients.
Let’s take a closer look…
Why I Love the Maxillary Palatal Root Socket
1. It is a minimally invasive way to improve spread and completely eliminate any cantilever.
2. Since it is a socket, it is lined with cortical bone. And, since it is adjacent the palate, it is in direct contact with dense palatal bone. Therefore, torque in the range of 30-60+ N-cm is consistently achievable.
3. It is a graftless option.
When Do I Utilize the Palatal Root Socket?
1. When present in the arch, the palatal root socket is my go to for improving A-P spread. If I cannot reach the second bicuspid site with a traditional 4 implant configuration – this is the first place I am looking.
2. I utilize the palatal root socket to improve composite torque value in cases with less than ideal torque. Adhering to the techniques discussed below, I can consistently get a torque of 30-60 N-cm at this site.
3. In cases of pathology or large defects where the first and second biscupid sites are simply not usable, the palatal root socket is my best friend.
- In these cases, I will “scoot” my typical premolar implant forward to the canine site. I will then add an implant in the palatal root site to eliminate the cantilever. I can then graft the pre-molar defect and return later – only if needed – to add an implant in this region.
In my practice, I prefer an option like this to a zygoma implant. In my opinion, zygomatic implants do have their place, but for a small subset of patients. When possible, I always prefer to utilize less invasive options to accomplish the goal.
How Do I Place an Implant in the Palatal Root Socket?
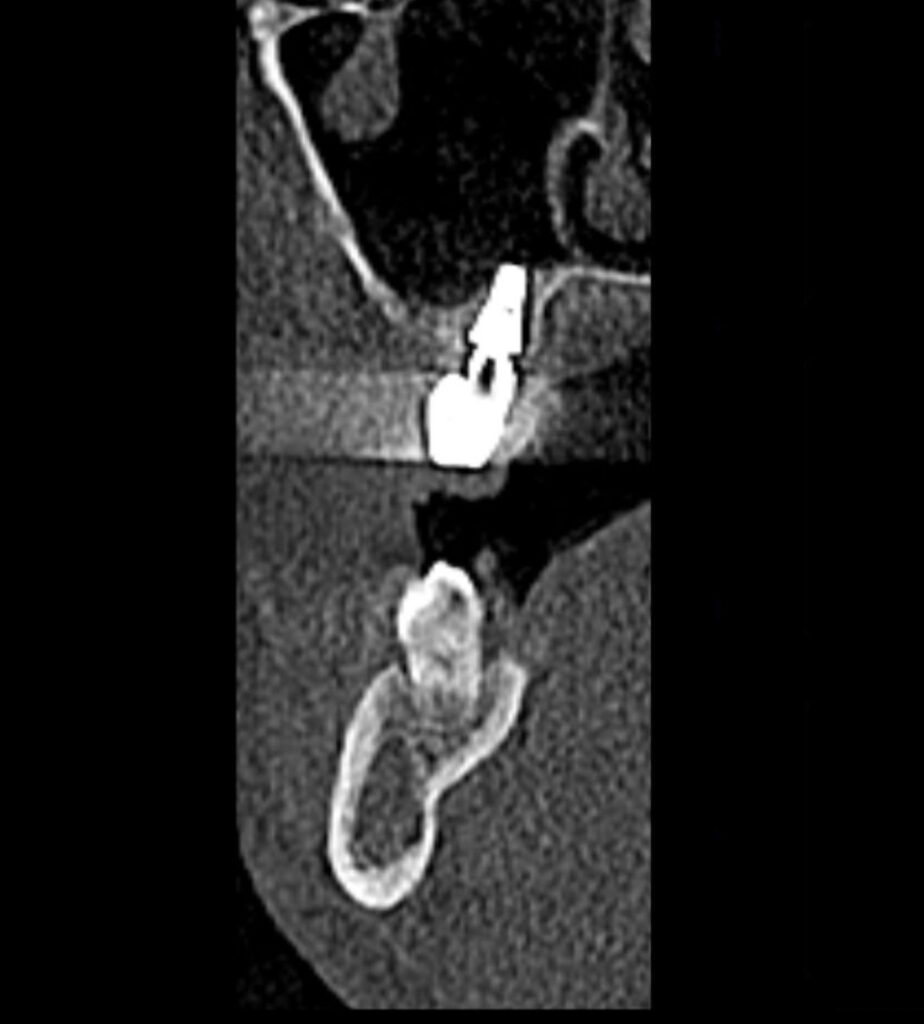
1. In order to predictably place a palatal root implant, I need at least 5 mm of socket depth. I prefer 8mm, but I can and do successfully place implants with at least 5 mm of socket depth.
2. I will use either a first or a second molar palatal root site – whichever has a more ideal depth. However, the first molar is preferable, as it is usually more easily incorporated into the prosthetic from a restorative standpoint.
3. The first step is measuring the socket with a periodontal probe to confirm the available depth (I do this after bone reduction).
4. If I have 5 mm or more of socket depth, I know that I can predictably place an implant in this region.
5. Almost every time…
The optimal implant size for the palatal root site will be a 5×8 mm tapered implant.
I would not recommend a parallel walled implant due to the conical shape of the socket. A parallel walled implant carries a much higher risk of spinning out. If you increase the osteotomy size to prevent this, you will compromise your torque value.
6. Here’s the trick with placement that is often a struggle to learn at first…
I start with a 3.5 mm or 4.0 mm drill – depending on the existing socket diameter. There is no point in using a starter drill because the palatal root socket is actually wider than this drill.
All a starter drill will provide you… is a risk of perforating the sinus membrane due to its sharp point.
If the socket is ~8 mm in depth (an ideal size):
I intentionally drill just slightly beyond 8mm – but very, very slowly. A drill speed of 50 rpm to a max of 200 rpm is utilized. This slow drill speed almost always ensures that a sinus membrane perforation is prevented.
Extending slightly beyond the 8 mm depth is vitally important! The socket is lined with cortical bone and is tapered at the apex. If you do not extend your osteotomy depth adequately, when you place your 5×8 mm implant it will tend to spin out and lose all torque at the dense, conical apex of the socket.
After using the 4.0 mm drill, I go straight to placement of the 5×8 mm tapered implant. This under preparation allows for great torque. However, it is not so under-prepped that the implant spins out.
If the socket is ~5 mm – 8 mm in depth (a slightly less than ideal size):
I will still utilize the palatal root site.
At less than 5 mm, I do not find this technique to be consistently successful and will move to other options such as a pterygoid implant.
Because I am planning on placing an 8 mm implant, but only have 5 mm – 8 mm of socket depth, I need to create additional space for the apex of my implant.
In this scenario I will again go straight to the 3.5 mm (or occasionally 4.0 mm) drill and drill very, very slowly – typically at 50-100 rpm. Utilizing the extremely slow speed to my advantage, I will gently push the floor of the socket up with the drill. In reality, I am performing a “poor man’s” indirect sinus lift. At this speed the drill more or less tents the bone up, and when controlled, does not tear the membrane.
I do not find the need to graft in these cases. In AOX surgery, with cross arch stabilization, I find that these implants integrate predictably without the addition of graft material. And because of that, I want to avoid adding in an extra, unnecessary variable that may be a potential source of infection.
At this point, I will place my 5×8 mm implant, knowing that ~2 mm or so will extend into the sinus cavity, but with an intact sinus membrane. In these cases, I am still able to generate notable torque given the surrounding cortical bone and under-preparation of the site.
A Word to the Wise…
If you are going to use a palatal root site, you have to walk the fine line of not over reducing in this area and eliminating the socket completely.
But… you also have to ensure you have reduced enough so that when you are extending your prosthetic with an implant and abutment in this region, you have enough restorative space.
In my experience, adequate reduction in most patients, tends to leave a socket somewhere between 5-8mm.
I hope you find the palatal root to be as much a pal to you as it has been to me.
Matthew Krieger DMD
P.S.
If I do notice a tear in the membrane, I still place the implant as I normally would. I have tried placing PRF to cover the perforation on many occasions, and also left small perforations without intervention. I have not noticed any significant clinical difference in either scenario. That being said – I always attempt to keep the membrane intact, and this is usually the case.
P.P.S.
There have been recent developments and releases of shorter AOX compatible implants. I am working on getting the opportunity to utilize these implants in scenarios where there is less than 8mm of bone at the palatal root site. I think that in these more atrophic palatal socket sites, shorter implants would likely provide just as much benefit with less risk of sinus membrane perforation.
P.P.P.S.
I do not follow the above protocol for a single unit implant. In those cases a traditional indirect sinus lift and/or direct sinus lift – including bone graft placement – would be performed with ideal prosthetic implant position/placement in the center of the alveolar ridge. However, I have found the palatal root socket technique to perform very well in the setting of AOX surgery.
Incredible – tysm!
Thanks! Glad you enjoyed the article Shae!
Great article I will definitely be using this technique. You had an article how you time implants and what MUAs you usually use. Is there any specific timing on a palatal root implant and an MUA that you usually use (17 or 30?)
Hi Shaun,
This all depends on the angulation of the socket which does vary patient to patient. However, in order to bring the access hole back toward the center of the arch, in my hands I use either a straight or 17 degree abutment. I don’t believe I have ever used a 30 degree.
Hello Dr. Krieger, thank you for all of the helpful information. When placing maxillary palatal root implants for a fixed hybrid, are you still placing only 4 implants? I have several cases that I have placed palatal root implants and the spread between the implants felt too large for only 4 implants, so I ended up placing 6. What are your thoughts or experience.
Thank you!
Great question. When I place a palatal root implant it is almost always in a 6 implant configuration. It is the “last” implant in the arch. If spread is less than ideal with a traditional 4 implant layout I will look to add a palatal root implant. But ideally I don’t use it as a stand alone posterior implant for that side.
Pingback: Your AOX Questions Answered (Part 1) - AOX Surgery