

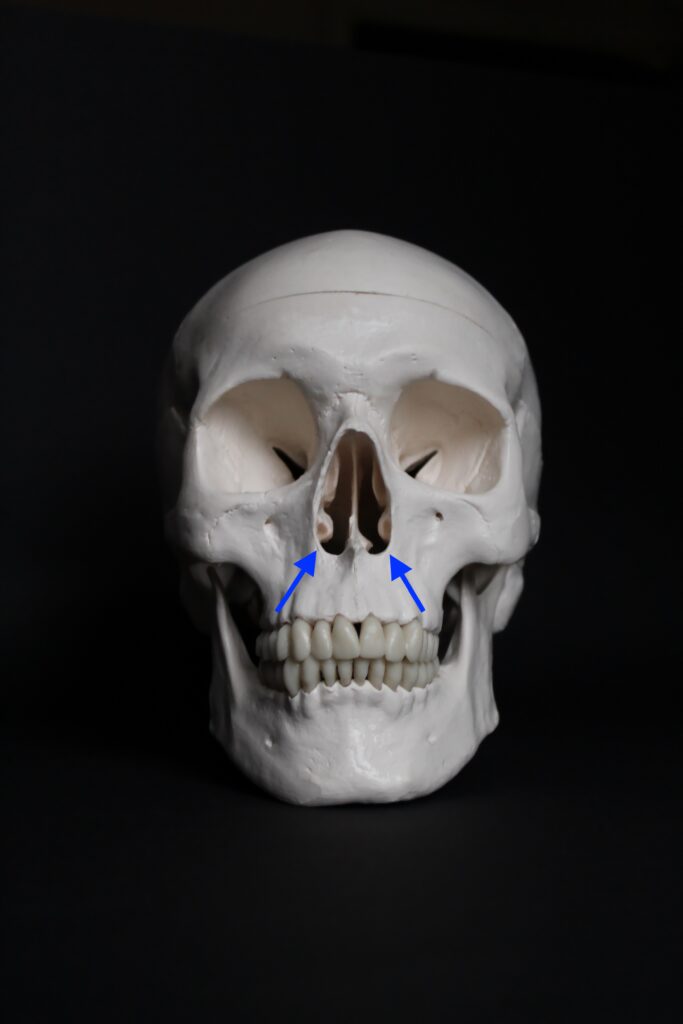
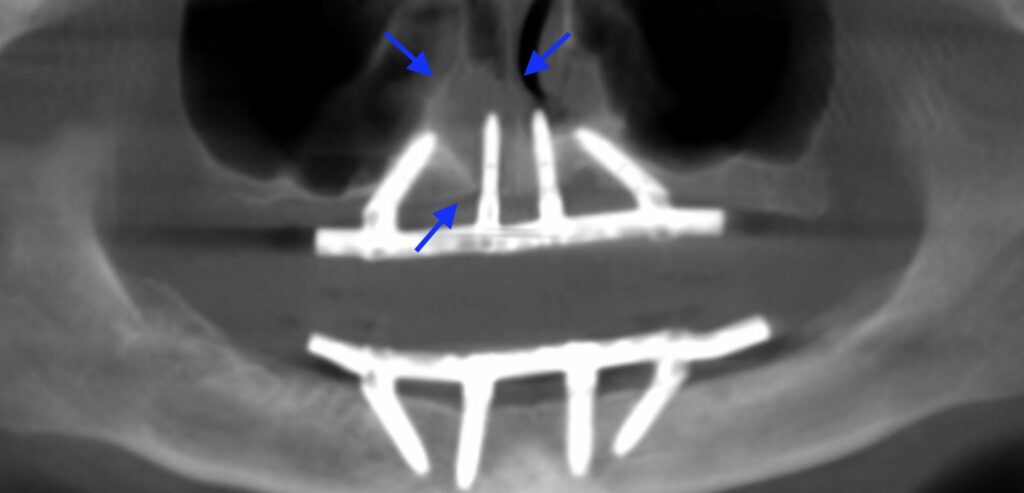
The piriform rim is a thin, cortical layer of bone that outlines the nasal aperture.
In laymen’s terms, it’s a rim of dense bone around the nose.
The maxilla, often having more cancellous bone than the mandible, will typically present with less bone density than its counterpart.
The piriform rim has become increasingly popular as a way for surgeons to improve implant torque value when less than ideal bone density is encountered during maxillary All-On-X surgery.
I agree that the piriform rim is an anatomic landmark with significant advantages for AOX surgery. I also engage and utilize the piriform rim when indicated clinically.
That being said, I have also seen and been referred some significant complications related to violation of the nasal floor or lateral nasal wall. As a result, I use this anatomic structure with respect and caution.
To be clear, I do very often extend my maxillary implants close to the level of the floor of the nose. In these cases, I may theoretically come in contact with the piriform rim. However, I attempt to always maintain a bony stop at the apical portion of my osteotomy, preventing the implant tip from actually entering into the nasal cavity.
If I am attempting to truly utilize and maximize torque at the piriform rim (which I do not commonly do), I will actually attempt to have a slight 1-2 mm extension of the implant apex into the bony nasal housing…without disturbing the nasal membrane.
For the purpose of this article I will define utilization of the piriform rim as having your implant apex pass through the cortical border of the piriform rim, extending slightly into the nasal cavity, for true bi-cortical stability.
Here are some Pearls & Pitfalls I have encountered that I hope make your experience with the piriform rim a pleasant one.
PEARLS
1. I only utilize this technique approximately once out of every 25 maxillary arches.
While this is a valid technique, and an advantageous one in certain situations, it is my opinion that you should not need to use it frequently.
If you require this technique on a regular basis to achieve adequate torque, you should consider re-evaluating your osteotomy and implant insertion technique.
My goal is a torque of 45-60 N-cm with each implant placement and I consistently achieve this without utilizing the piriform rim.
And yes…I’ll go ahead and answer the question you want to ask: I do treat the difficult, low density, osteoporotic, atrophic patients too…
2. Utilize the vomer as an adjunct for increased torque in the areas of #7/10 as opposed to just the piriform rim/floor of nose.
Utilizing the vomer bone does in fact mean you are passing through a portion of the piriform rim on your path of trajectory.
However, the vomer bone also provides you increased bone height to allow you to maintain a bony stop and not perforate through into the nasal cavity.
If you only engage the piriform rim at the nasal floor (lateral to the vomer bone), a portion of your implant will perforate through into the bony nasal cavity. If this perforation can be avoided, I always choose to do so.
I will note that because I almost exclusively perform an Inverted V Configuration with implants #7/10, I do routinely extend these implants to the level of the piriform rim. I do not however attempt to pass through the piriform rim into the nasal cavity.
3. Elevate the nasal mucosa.
Ok…I’m going to be honest with you. I do not typically do this…
However, we probably all should do this if true engagement of the piriform rim and extension of the implant into the nasal cavity is planned.
Why?
The increased torque value of the piriform rim is gained as the tip of the implant travels through the rim of cortical bone and therefore into the nasal cavity.
There will be some extension into the nose…The key is NOT perforating the nasal mucosa. This is where you can really create problems.
So if you are planning a true utilization of the piriform rim, and by definition extension into the nasal cavity, you should elevate and protect the nasal mucosa during your implant insertion.
One workaround that is effective in my hands is drilling these osteotomies very, very slowly.
I will drill at between 50 rpm’s to a maximum of 200 rpm’s and also advance the drill slowly.
At this speed the drill will almost never perforate the nasal mucosa, but will in fact tent it up slightly.
This avoids the need for elevation of the nasal mucosa (in my hands).
However, please note that I am also only extending 1-2 mm through the piriform rim. Many practitioners go farther than this – which I do not advise. There simply is no benefit to going farther into the nasal cavity.
PITFALLS
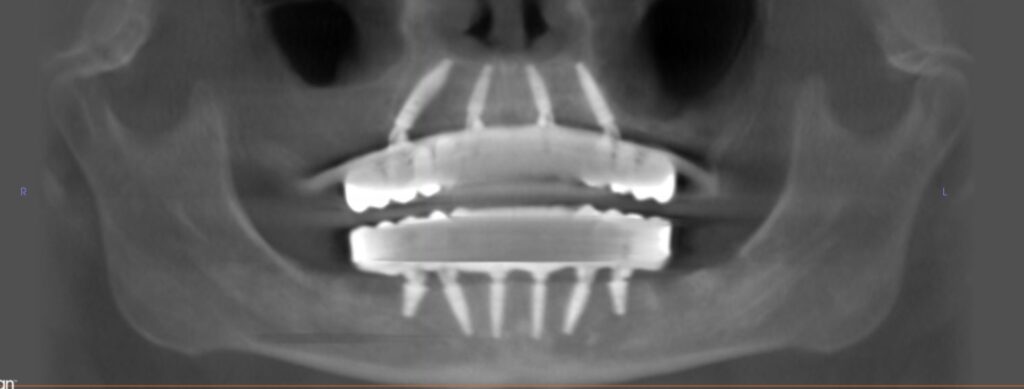
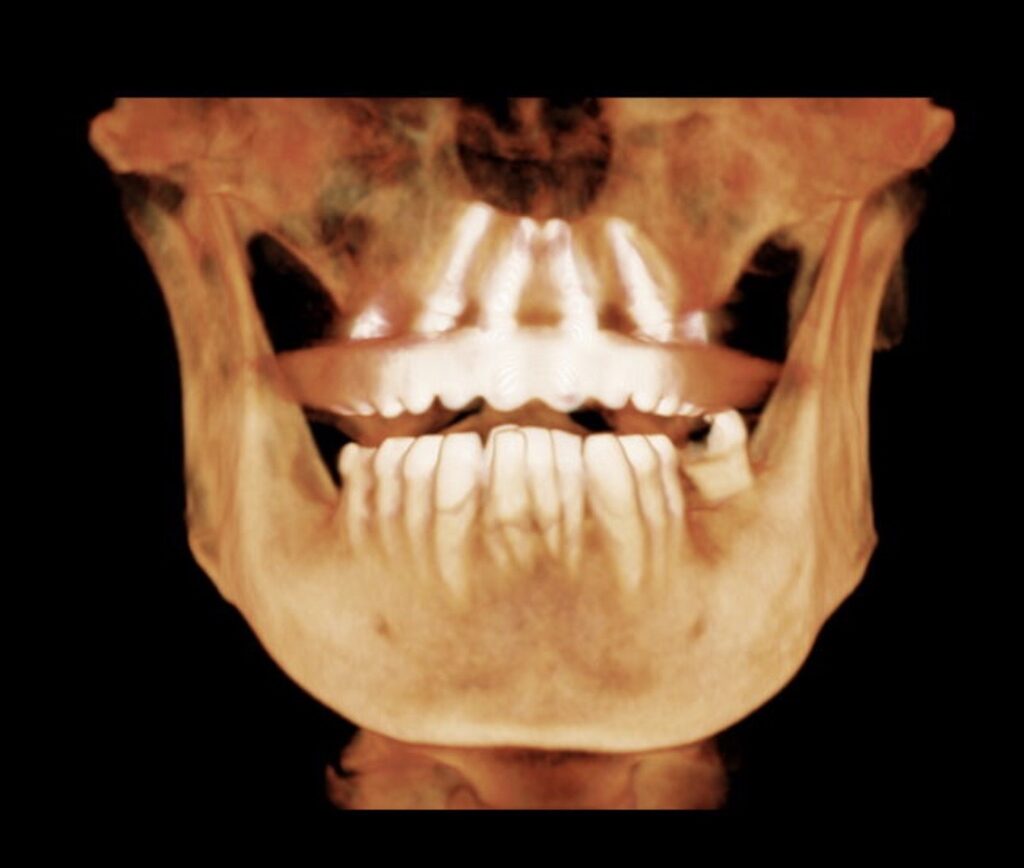
1. Placement of the implant too deep into the nasal cavity and/or unplanned extension into the nasal cavity.
Yes I have done this myself. And with enough arches, you will too at some point.
I must caution you regarding the urge to always engage the piriform rim.
I see many new providers that have every implant extending into the nose because they are “engaging the piriform rim”.
And furthermore…the implants are 5 or 6mm into the nose. I was once referred a case for a second opinion with all 4 implants a staggering 10mm into the nasal cavity.
A significant extension into the nasal cavity is simply not necessary.
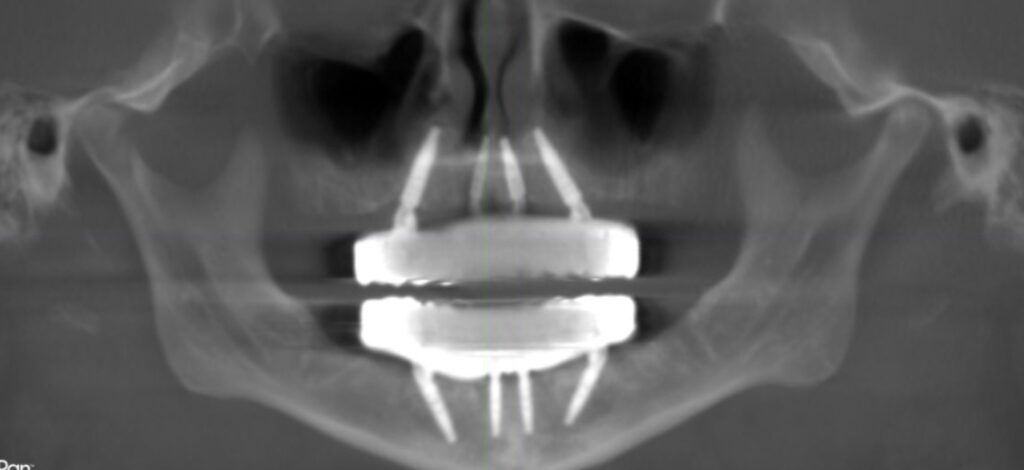
The piriform rim is a thin layer of cortical bone. You can fully engage this thin layer of bone by passing your implant tip through the piriform rim with a 1-2 mm extension.
This will generate adequate torque while protecting as much of the nasal cavity as possible and limiting the risk of mucosal perforation.
There is no more bone to engage beyond this point… You can stick a 20mm implant into the nose…the engagement of the piriform rim is the same thin layer at the nasal aperture.
It simply makes no rational sense to extend your implant deep into the nasal cavity.
2. Perforation of the nasal mucosa.
This is the most likely complication you will encounter with routine placement of these implants.
Keep in mind this perforation does not have to occur only at the time of surgery.
I have been referred patients who had implants placed years ago that extended into the nasal cavity.
These patients developed a failing implant and subsequent infection that then tracked into the already violated nasal cavity, creating a dehiscence in the nasal mucosa and a communication between the nose and mouth.
Management of these complications can be time consuming for the surgeon and unpleasant for the patient.
Fortunately, intranasal complications are not incredibly common with engagement of the piriform rim. However, they can and do occur.
If you are using this technique frequently, it’s only a matter of time before you become an expert on management of intranasal infections and oral-nasal communications…
Over extension of implants into the nose can also lead to complaints from patients who can feel or even at times visualize the implants through the mucosa.
The ways in which I try to avoid these scenario are:
Elevation of the nasal mucosa to protect from perforation by the drill or implant, and/or drilling very, very slowly to avoid mechanical perforation with the drill.
ONLY extending into the nasal cavity 1 or 2 mm.
Rarely, engaging the piriform rim in a bicortical nature. Again, I do not find this technique routinely necessary to achieve adequate torque.
3. Using a non-tapered implant.
In my hands a tapered implant is a must for successful engagement of the piriform rim.
For reference, I choose to utilize the Neodent Helix implant.
When practitioners first start using the piriform rim to improve torque, the following scenario often plays out. This is also exactly what happened to me…
Soft bone is encountered in the maxilla and a low torque value is achieved.
The decision is made to extend the osteotomy to engage the piriform rim.
Because the bone is soft, the osteotomy is underprepared – let’s say to a 3.5 mm drill width for a 4.0 mm width implant.
An implant designed for “soft bone”, with wider implant threads and often less taper, is selected. This is very logical. In soft bone, using an implant designed for soft bone makes sense.
Initially as the 4.0 mm diameter implant is advanced into the 3.5 mm osteotomy, a slight increase in torque is noted. As confidence surges and thoughts of high torque values flood the mind, the implant is advanced to the piriform rim where….what?!
It spins out…completely losing all torque.
The dense nature of the cortical bone at the piriform did not allow the un-tapered / parallel implant to advance. The osteotomy at the dense rim was smaller than the implant tip, causing the implant to spin out.
This really…well…pissed me off a few times before I caught on to what was occurring in these scenarios.
Now, anytime I engage the piriform rim (or any island of cortical bone with increased density) I use a notably tapered implant like the Helix. This allows the narrow tip of the implant to pass through the under-prepped but denser portion of cortical bone at the rim, increasing torque as it advances. Resist the urge to use a less tapered implant “designed for soft bone”…
When performing this technique, I will still under-prep, but slightly. I know with the Neodent Helix implant I can get away with a 3.5 mm prep width or a 3.75 mm prep width and a 4.0 mm implant insertion. I cannot get away with a 3.5 mm prep width and a 4.3 mm implant.
If you are going to use a non-tapered implant (which I don’t recommend) you will have to refrain from the desire to under-prep when engaging the piriform rim in order to prevent your implant from spinning out.
The piriform rim is a wonderful anatomic landmark and provides much benefit to AOX surgeons.
While I am an advocate of its occasional utilization, I am a greater advocate of its respect.
This is a wonderful tool to have in your toolbox. That being said, I use the technique of true bicortical piriform rim engagement rarely. It simply is not necessary the vast majority of the time and the risks do not outweigh the benefits in my opinion for routine use.
I encourage surgeons to learn to wield its powers wisely. While the piriform rim can be your best friend, should you get greedy it can also be your worst enemy.
Matt Krieger DMD
What is the fix if it penetrates the nasal mucosa? Cut off the apices and will mucosa close on its own?
Thanks
This would depend on many factors. The patient scenarios that I have been referred to manage that required surgical intervention presented with:
1. A visible intranasal mucosal dehiscence
2. Purulent discharge intranasally
3. Pain
4. Implant mobility
In these scenarios, as the implant had failed, the implant was removed, the site was back-filled with PRF, primary oral gingival and mucosal closure was obtained and the nasal mucosa healed secondarily.
Doc, Love the blog thank you for sharing all this great info. I too place neodent helix (switched recently) and am newish to AOX land. You mentioned above that you prep a size down (3.5 for a 3.75 and 3.75 for a 4.0) are you automatically under prepping all your sites like this? I know different from singles etc where i have not found it necessary to under prep (given the cortical bone) Just trying to get a feel for the specifics of this implant – which so far I love. Also are you ever opting for a GM drive over a GM helix? Thank you.
Hey Matt! Check out this coming Tuesday’s (Jan 30) AOX Newsletter and I will address this question in the newsletter, as others readers have had similar questions! Thanks –
*If you haven’t signed up for the newsletter you can do so on this website (aoxsurgery.com) via the “newsletter” link on the top right or via the newsletter icon on the main page.
Pingback: The Benefits of A Tapered Implant in AOX Surgery - AOX Surgery