
Archived Newsletter Re-Post.
The AOX Newsletter • April 2024 #13
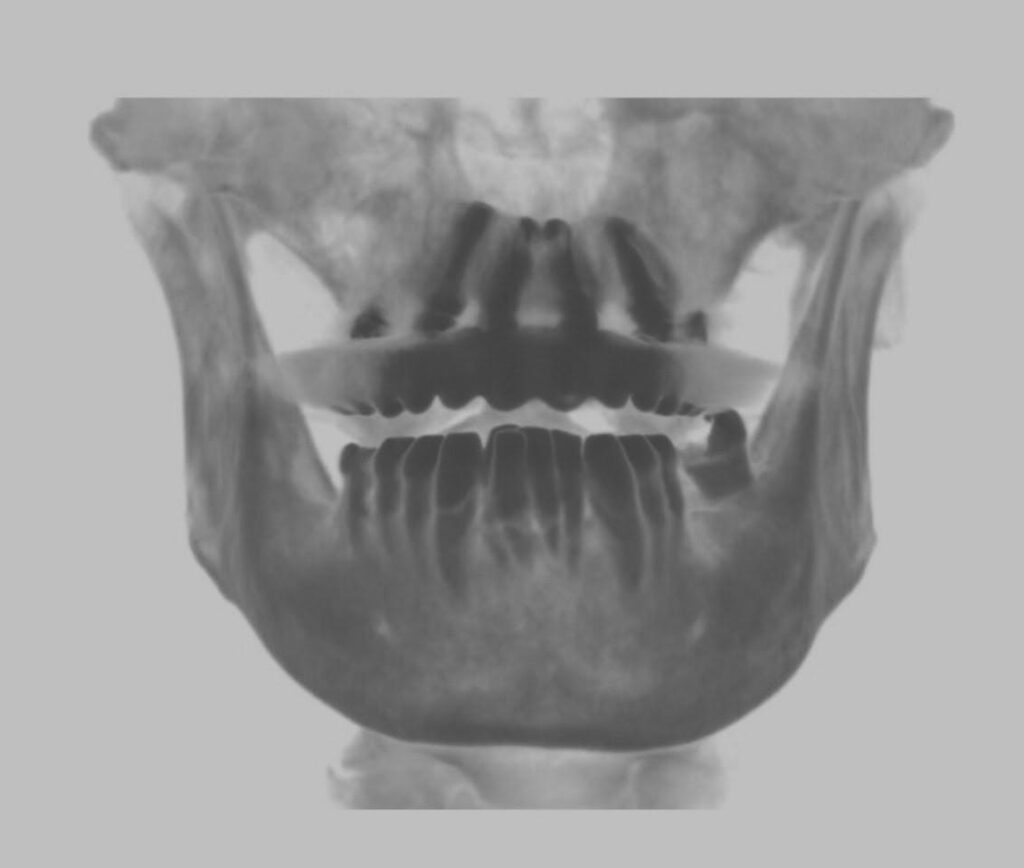
The vast majority of the time I place my anterior implants in an “Inverted V” configuration at lateral incisor sites #7/10.
The rationale behind placing the anterior implants at these anatomical locations is that when combined with the posterior implants, a stable “trapezoid” outline is created that can handle masticatory forces.
Locations #7/10 are also ideal for limiting an anterior cantilever, while still maintaining the stable trapezoid shape.
If implants are placed closer to the midline at #8/9, there may be a slight increase in A-P spread and therefore further elimination of any anterior cantilever. However, this is not commonly done as it shifts the stable trapezoid outline into a less stable triangular or pyramidal outline. In this sense, implants #8/9 function more like single implant than they do as two individual implants.
For these reasons, my go to AOX configuration includes placement of my anterior implants at sites #7/10. That being said, there are a few select times where I will opt to place implants at sites #8/9 instead of #7/10.
Listed below are the 4 instances in which I select sites #8/9 for anterior implant placement. In all of the scenarios discussed, I am still maintaining the “Inverted V” configuration.
1. A Narrow, V-Shaped Palate.
When a patient presents with a narrow, V-shaped palate, placement of implants in the traditional #7/10 locations will often leave the patient with a sizable anterior cantilever. This is because the apex of the V-shaped maxilla extends well beyond the lateral incisor sites.
To offset and eliminate this cantilever, I move my anterior implants toward the midline into the pyramidal apex at sites #8/9.
Very rarely, I will consider a true isolated midline implant if the V-shape is extremely severe. However, I normally do not find this necessary or beneficial. You can read more about this here: “7 Reasons Why I Almost Never…Ever…Place a Midline Implant”.
In these cases, I find that the subtle shift of implants from sites #7/10 to #8/9 solves the anatomical cantilever and produces a stable prosthetic.
2. The Presence of Pathology.
When patients present with benign pathology such as large cysts, extensive granulomatous lesions, or acute infection at the lateral incisor sites, I attempt to avoid these locations altogether. In these cases, I will shift the anterior implant to healthier bone.
My preference is always to shift “forward” to the #8/9 sites as opposed to shifting “backward” to sites #6/11. Shifting backward would increase the anterior cantilever and/or require a 5th midline implant. Shifting forward eliminates the cantilever and does not require the unnecessary use of an extra implant.
If only one site presents with pathology, I will shift my anterior implant placement on only this side. However, to avoid creating too much of a triangular shape to the implant placement distribution, I will still place my contralateral implant at the normal lateral incisor position – assuming the bone on the contralateral side is healthy and free of pathology.
3. Significant Fracture or Loss of the Buccal Plate.
It happens. Extraction of teeth can result in the fracture or loss of the buccal plate. While we all obviously try to avoid this – it is inevitable at times.
If I have a notable buccal plate fracture at extraction site #7 or #10, I will shift the affected implant site anterior to #8 or #9.
I absolutely prefer doing this over moving the implant more palatal at the lateral incisor site.
While moving the implant palatal will avoid the buccal plate fracture and provide intact, surrounding cortical bone – it will place the implant in a poor prosthetic position.
In my opinion, moving the implant to the central incisor region and placing the implant in a more favorable prosthetic position is far more advantageous for the surgeon, the restorative doctor, and the patient.
4. Severe Atrophy and/or Significantly Pneumatized Sinuses.
In cases of severe atrophy and/or significantly pneumatized sinuses, it is not uncommon that the distal implant in a traditional All-On-4 configuration may only be able to be placed at the distal canine site. In this situation, I will often place a pterygoid implant to eliminate the posterior cantilever (this is just one technique that is used).
While this solves the problem of the posterior cantilever, in order to prevent the anterior implants from being too close to the posterior “canine/1st bicuspid” position implants – I will shift the lateral incisor position implants to the central incisor position (or often split the difference).
Moving toward the midline creates space between the adjacent implant apices and allows for optimal implant angulation. Furthermore, it makes it easier to engage the midline nasal crest, allowing for extra implant length and torque in these atrophic cases.
I hope you find this “shift” in thinking beneficial during those tough AOX cases.
Matthew Krieger DMD
“Adaptability is being able to adjust to any situation at any given time.”
John Wooden
Q & A with Dr. K
“Why don’t you routinely place extra implants? Don’t you want more implants in case one fails?”
I almost always place either 4 or 6 implants.
My goal is adequate composite torque and elimination of the cantilever (or as minimal a cantilever as possible). In my opinion, these two factors are more important than how many implants you place.
If I can achieve this with 4 implants – then that is all that I place. If this requires 6 implants, then I place 6 implants.
I almost never place additional implants “just in case”. This is a common technique employed by many practitioners. However, in my mind, it does not make mathematical sense.
As an AOX surgeon your goal should be a failure rate around 2%. So for every 100 implants you place, ~2 will fail.
If you place an “extra” implant on each case as a back-up, you will have placed 100 extra implants to offset 2 actual implant failures.
This also assumes the “extra” implant actually helps compensate for the failed implant – which it may not.
In my practice, I would have replaced only those 2 failed implants.
In theory, this means you would have placed 98 more implants than I did – to accomplish the same goal of replacing 2 failed implants.
This subjects your patients to unnecessary surgery, substantially increases overhead, and makes you work a lot harder than you really should be working.
Archived newsletters are released on a delayed timeline, a few months after the original publication. If you would like to receive these newsletters in real time please sign up here.