
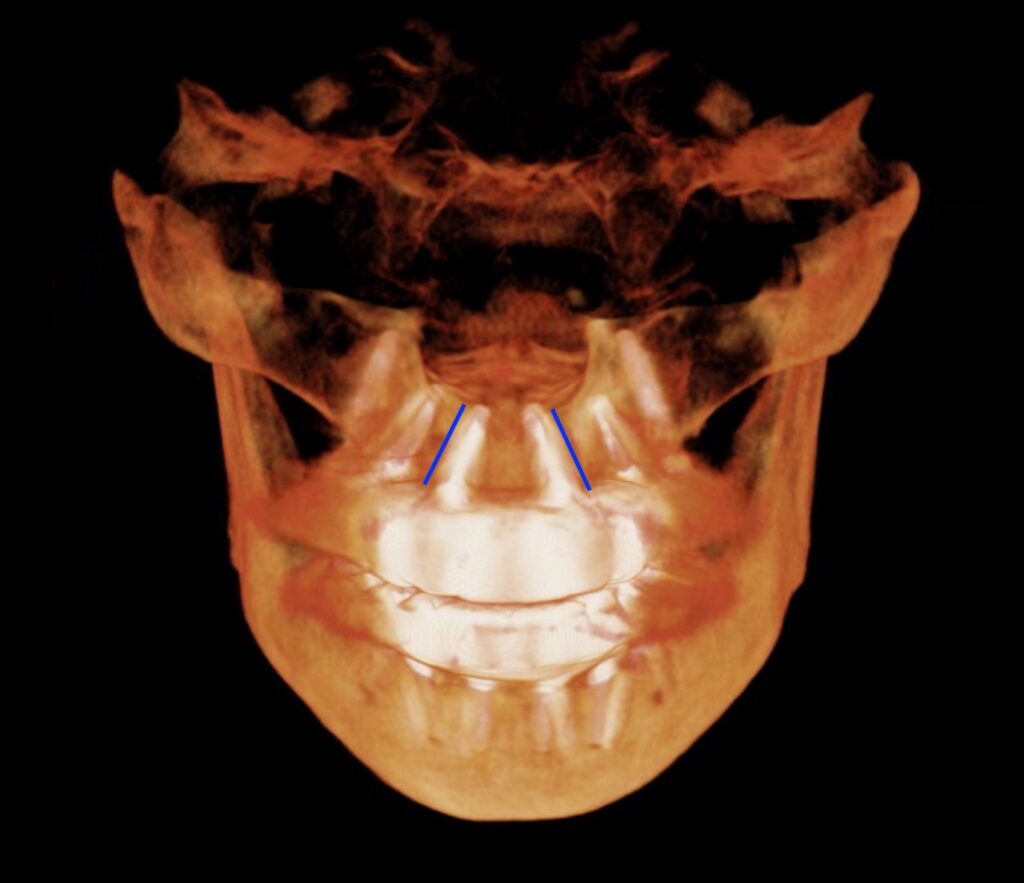
There are three primary ways to place anterior maxillary implants (#7/#10) in an All-On-X configuration.
1. Vertical Orientation
2. “M” or “M-4″ Configuration
3. “Inverted V” or “V-4” Configuration
All of these options are clinically sound. I know great surgeons that fall into all three of these categories.
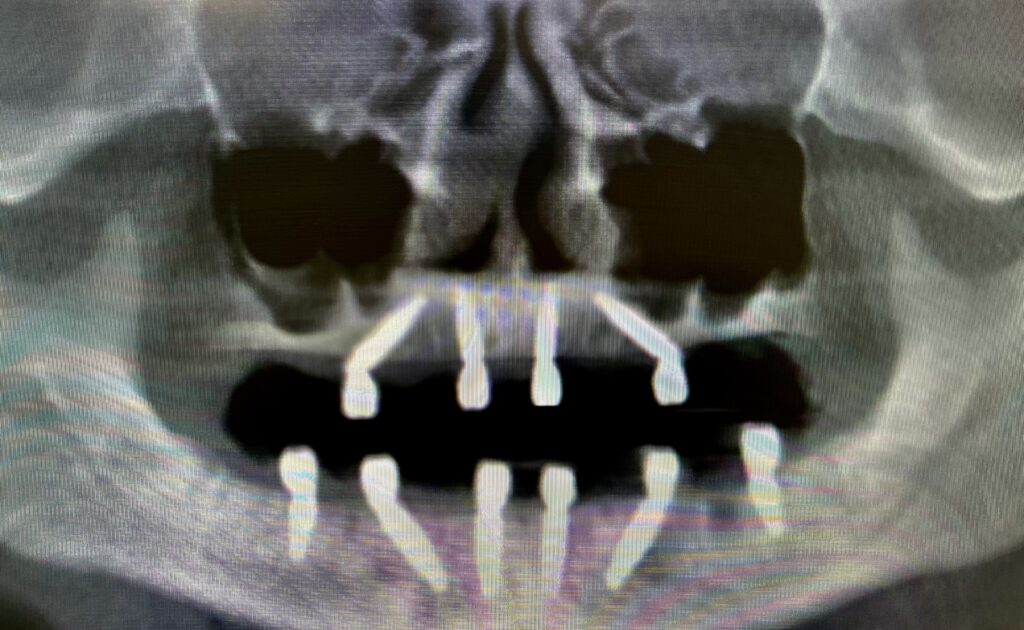
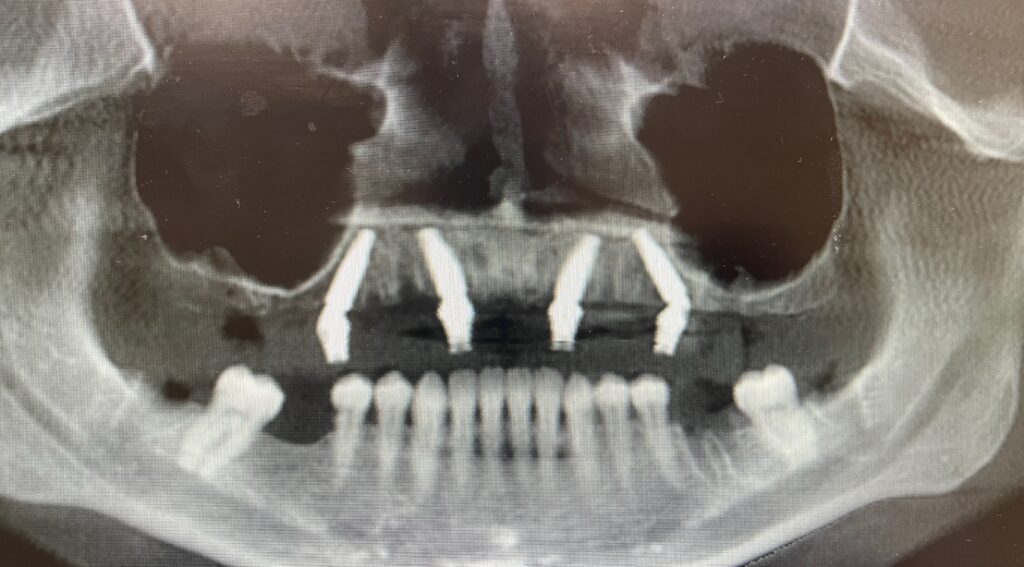
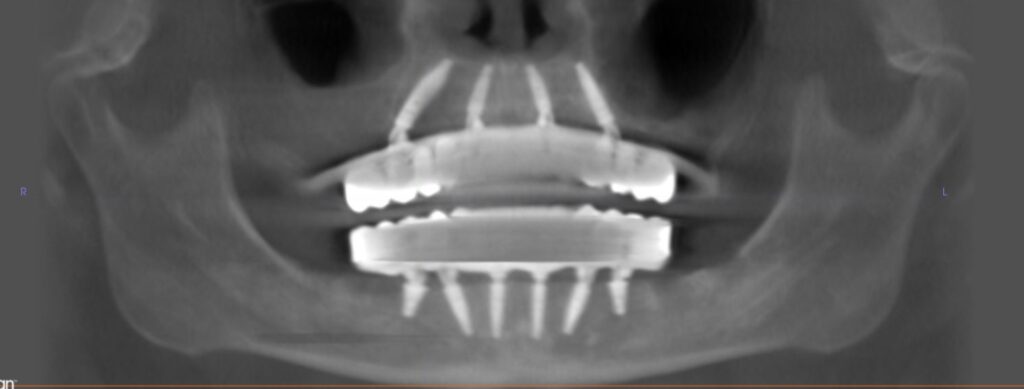
And, as shown by my post-op X-rays above, I have also placed implants using all three of these methods.
And…I am absolutely convinced that what is likely the least commonly used orientation, is by far the best!
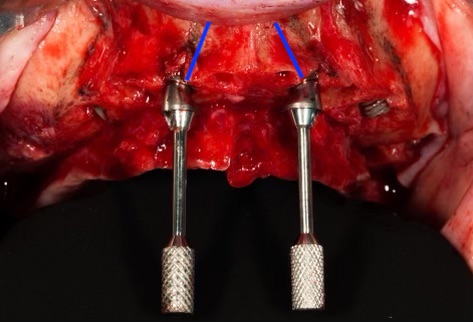
About a year and half ago I converted to almost exclusively placing my anterior implants in what I call an “Inverted V” configuration. I haven’t looked back since…
Here are 5 reasons why I think the “Inverted V” is simply the best way to place your anterior maxillary implants:
1. The “Inverted V” provides increased implant length (and therefore torque).
The majority of surgeons I know place their anterior implants in a vertical position.
While this is ok…you will typically lose 1-3 mm in implant length before hitting the floor of the nose.
Meaning, if you have 10 mm of bone height from the alveolar crest to the floor of the nose, you can place at most, a 10 mm implant.
By angling the implant into an “Inverted V” configuration you are able to gain ~1-3 mm of implant length.
This is due to the angulation of the implant and increased distance traveled as it is not in a straight line. The shortest distance between two points is a straight line…
As discussed below, utilization of the vomer bone can also contribute to this increased implant length – however I do not always engage this bone.
Therefore, the “Inverted V” configuration now allows you to place an 11.5 or 13 mm implant in this same 10 mm of bone height.
This longer implant will consistently improve torque and therefore the probability of successful integration.
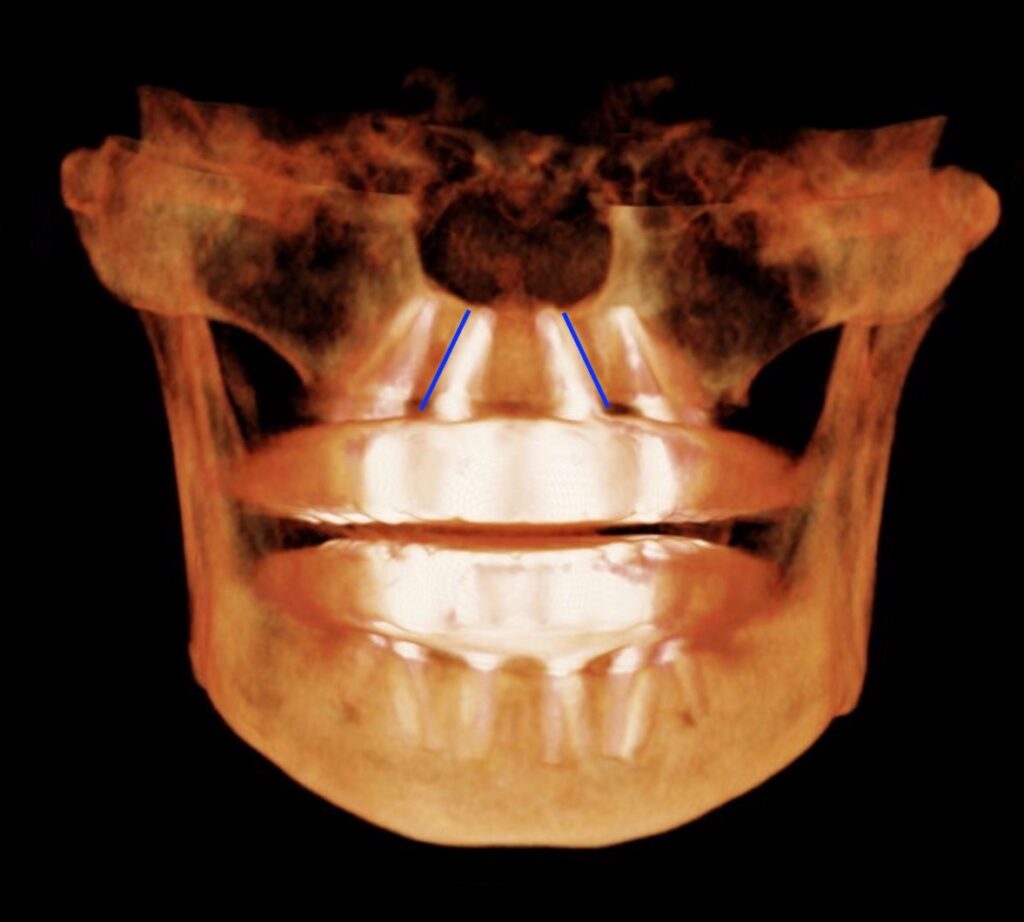
2. The “Inverted V” also improves torque due to engagement of the vomer bone.
The vomer bone sits just superior to the midline nasal floor and is very dense cortical bone.
Engaging the vomer bone is a great way to improve torque in cases with soft anterior maxillary bone. This is only possible with the “Inverted V” configuration.
My goal is to have my implants torque between 45-60+ N-cm in this anatomical region.
That being said, I do not always extend my implants into the vomer bone. I do not think it is always necessary. I utilize this region in soft bone where low torque is otherwise likely.
However, I always place my anterior implants in an “Inverted V” configuration, regardless of bone density. Using this technique, if I feel soft bone during osteotomy preparation, I can easily extend my osteotomy along the same path into the vomer bone for added torque value.
I want to caution you that engaging the vomer bone is NOT just perforating through the nose. You should feel a bony stop and be in solid cortical bone.
I feel it is very important to avoid violating the floor of the nose arbitrarily and I it is my opinion that this is done far too commonly by many practitioners. I have seen and been referred significant complications as a result of improper extension into the nasal cavity.
3. The “Inverted V” protects real estate for posterior implant failure replacements.
Yep you read that right. This is one of the best and most beneficial surgical aspects of placing your anterior implants in an “Inverted V” configuration!
You save and maintain posterior bone real estate!
Let me explain…
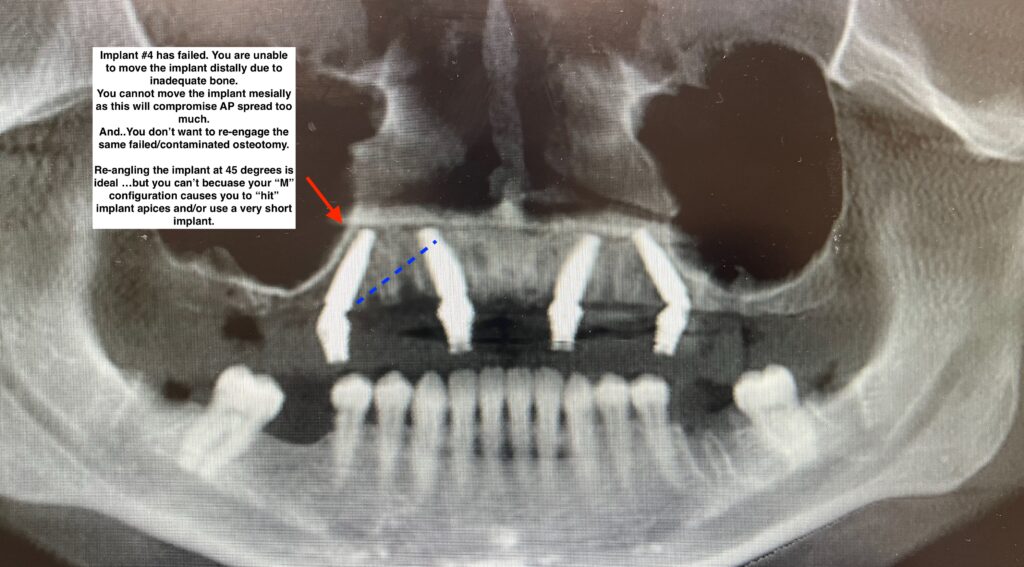
Let’s say you have a posterior implant failure of #4 or #13 and it is angled at 30 degrees.
Options for most practitioners are usually:
- Remove, graft and replace the implant in ~ 4months. The patient will be placed in a temporary removable prosthesis during this time.
- Place a ptergyoid implant for the interim period and load the patient while the graft heals at the implant removal site. Replace an implant at this site in ~4 months.
- Place a zygoma implant. This is a significant surgery for the failure of just one implant that also carries some more notable surgical risks.
- Move the implant forward. This reduces A-P spread and is less than ideal.
- Or… remove and replace the implant in the same osteotomy. In my experience, this carries a higher chance of repeat failure.
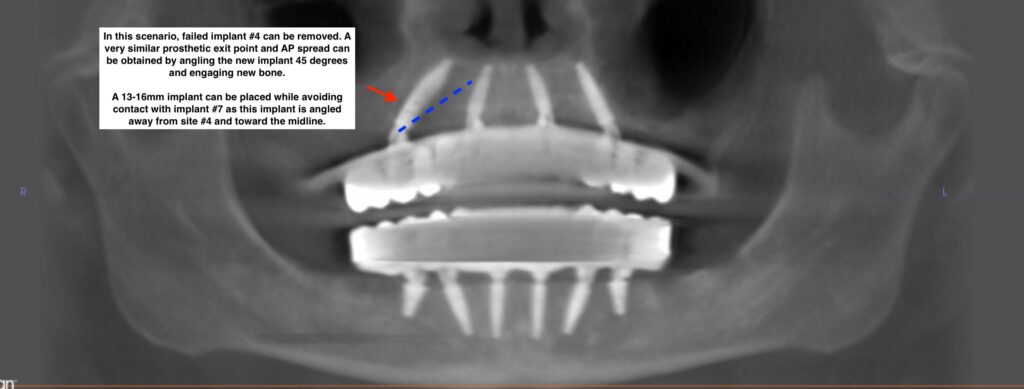
But wait…what if you could simply angle the implant at 45 degrees and exit at virtually the same crestal point…all while engaging new bone? It’s so simple……
Most practitioners cannot do this consistently, however, because when using either the “M” or the “Vertical” configuration for their anterior implants, a replaced 45 degree implant will either hit the anterior lateral implant or require a very short posterior implant to avoid this collision.
Ahhh….but what if your anterior implants were in an “Inverted V” configuration!?
They would be completely out of the way for you to angle a new implant at 45 degrees, without hitting your anterior implants!
Think of the ease of this…and the benefit to your patient who you have just saved from an unnecessary zygoma surgery.
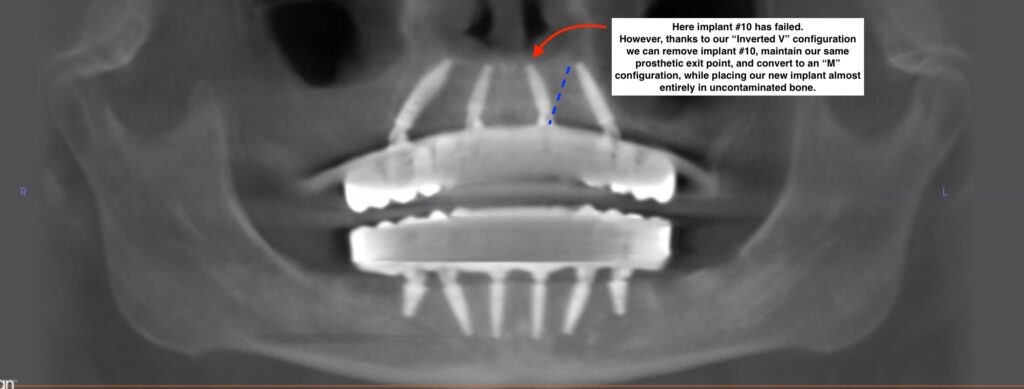
4. The “Inverted V” creates a simple and effective way to replace an anterior implant should it fail.
In the event of an anterior implant failure with a vertical orientation, you typically need to move the replacement osteotomy either laterally into the canine position or medially into the central incisor position – if you want to avoid reusing the same failed osteotomy site.
While this is ok…the ideal scenario would be to replace the implant at virtually the same exit point, in the lateral incisor position, while not engaging or only minimally engaging the previous failed osteotomy site.
This is very difficult to do with an original vertical orientation.
Even if you redirect your angulation, a large part of your implant will still be in the previous failed and contaminated osteotomy site.
However, if your originally implant was in an “Inverted V” configuration you are now able to remove this failed implant, and redirect to an “M” configuration.
This allows you the same exit point but with 90 percent or more of the implant in a new, uncontaminated, and previously unused osteotomy site.
In my experience being able to maintain an ideal implant distribution, while also avoiding freshly failed implant sites, is key to successful implant integration following a failure. An “Inverted V” configuration provides this option.
5. The “Inverted V” provides superior prosthetic abutment flexibility for the surgeon and restorative doctor.
One of the things patients complain about most is a large, bulky prosthetic on the palate! After all…they did NOT pay to have a denture.
If you are placing your anterior maxillary implants in a vertical orientation you have to be SPOT ON to create parallelism throughout your abutments, as well as an ideal screw access at the cingulum of the central incisor.
Even if you are using a guide it can be difficult with vertical implants and the concavity/curvature of the anterior maxilla to achieve the ideal screw access position.
Why do you have to be spot on with vertical implants?
- If you place your implants vertically…you typically confine yourself to a straight abutment.
- A vertical implant with a 17 or 30 degree abutment will almost always have a screw access position that is either too facial or too palatal. The angled abutments simply create an over-correction on a vertical implant.
- So, with a vertical implant, a straight abutment it is…
Unfortunately, a straight abutment has no flexibility for you or your restorative doctor. You cannot move or reposition a straight abutment.
It’s just that…straight. One shot is all you got!
Enter the “Inverted V” configuration.
In order to achieve this orientation, I angle my implants at ~17 degrees (less commonly 30 degrees).
In my hands a 17 degree abutment on “Inverted V” implants #7 & #10 almost always creates a parallel path of draw.
Now here’s the real magic…
I can leave them perfectly parallel if my screw access is also ideal.
But, I can also rotate them within an ~30 degree circular rotation and move them more facial or more palatal as needed to achieve the ideal cingulum exit point…while still being parallel enough for restoration.
This allows both myself and my restorative doctor flexibility in the position of the screw access!
This also provides a greater likelihood of patient satisfaction by creating the ability to position the anterior abutment screw access points for a thinner palatal prosthetic.
With vertical implants and straight abutments, the only control you have over the screw access and your parallelism, is the one shot you get at the time of your implant placement. Don’t put so much pressure on yourself…
Here’s to the “Inverted V”… Here’s to options…
Matthew Krieger DMD
Great points! Will incorporate this into my practice!
Definitely going to try this on the next arch
Awesome Jeff and Mike! Let me know what you think!
Solid points about the V formation. Loving the level of contingency planning.
Pingback: The Piriform Rim: Pearls & Pitfalls - AOX Surgery
Pingback: 7 Reasons Why I Almost Never…Ever…Place a Midline Implant - AOX Surgery
Pingback: Questions & Answers: The Inverted V Configuration - AOX Surgery
Pingback: Surgical Management of the Dreaded High Smile Line - AOX Surgery
Pingback: What If My Implant Apices Are Touching? - AOX Surgery
Pingback: When & Why I Place Implants at #8/9 (Instead of #7/10) - AOX Surgery